This chapter describes the following TMF administration topics:
Tape libraries
OpenVault as a loader
Automatic volume recognition (AVR)
Message daemon and operator interface
Starting and stopping TMF
Dumping to tape
This section describes how TMF interacts with the tape library software subsystem and also covers some high-level configuration information for StorageTek, IBM, and EMASS libraries (automatic loaders).
TMF always communicates to the tape loader via an intermediate software system that is provided by the library vendor.
For the StorageTek library, a software package called ACSLS runs on a SUN host. For the IBM library, a software package called Controlled Path Service (CPS) runs on an IBM RISC System/6000 platform. For the EMASS library, the package is called VolServ and runs on a SUN host.
These software systems, ACSLS, CPS, and VolServ, receive requests from TMF and pass them on to the actual tape libraries for processing. They also send responses back to TMF for any given action.
The diagram in Figure 3-1, shows the software and hardware configuration between the IRIX host and the StorageTek, IBM, and EMASS libraries.
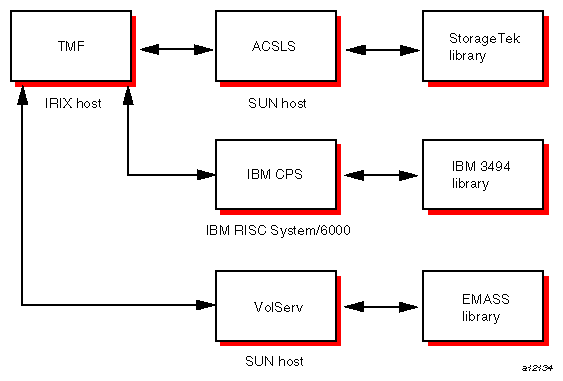
TMF supports a variety of StorageTek tape devices and libraries. For a definitive list, see the IRIX TMF Release and Installation Guide.
TMF communicates with the ACSLS software via a child process called stknet, which TMF starts after the library is configured up (up means that it is running and waiting for tape requests).
 | Note: Check with your StorageTek representative to validate the values of CSI_UDP_RPCSERVICE and CSI_TCP_RPCSERVICE. |
TMF supports one IBM library, IBM 3494, and specific IBM tape devices. For a definitive list, see the IRIX TMF Release and Installation Guide.
TMF communicates with the IBM CPS software via a child process called ibmnet, which TMF starts after the library is configured up.
TMF supports EMASS libraries. For a definitive list, see the IRIX TMF Release and Installation Guide.
TMF communicates with the vendor-supplied software interface, VolServ, via a child process called esinet which TMF starts after the library is configured up.
The UNIX storage server host name must be defined in the TMF configuration file, the local /etc/hosts file. For more information, see the hosts(4) man page. The UNIX storage system host name also must be specified in the server parameter of the LOADER definition in the /etc/config/tmf.config file.
If you are using the UNIX version of the StorageTek library, you must also ensure that CSI_UDP_RPCSERVICE and CSI_TCP_RPCSERVICE are set to TRUE in the /usr/ACSSS/rc.acsss file of the UNIX storage server host. Your local StorageTek representative should be able to assist you in this matter.
It is recommended that you use the installation documentation for the libraries at your site to correctly install these products.
A mixed environment consists of devices serviced by a manual operator (attended mode) and devices serviced by a library (unattended mode). If TMF services mount requests in a mixed environment, you must organize the devices to use both devices and loaders in the most efficient manner possible.
A volume has a domain associated with it and, as such, has a preferred or best loader to service a mount request. If the domain of a tape cartridge is a tape vault, the best loader is an operator. If the tape cartridge resides in the library's domain (silo), the best loader is the library.
Each tape device belongs to a device group, which is a collection of devices with equivalent physical characteristics. Although cartridge devices can have equivalent physical characteristics, you should consider the manner in which the devices will be serviced to determine whether or not they should be grouped.
One of the principal reasons for using a library is that the loader can be run in unattended mode (that is, without an operator). Using the library in this manner means that no imports or exports are considered, and a user-requested tape mount that cannot be satisfied by the library is canceled.
The easiest way to prevent canceled mounts is to assign the library drives to a device group different from the one serviced by manual operators. A user can then determine whether the required device group is available before requesting a tape mount. The only drawback to this method is that the user must be aware of the domain in which the tape resides and, if necessary, make changes to scripts if the domain of the tape changes.
For operations that have 24-hour operator coverage, all tape cartridges can be assigned to one device group, with the operator deciding whether the mount request should be queued or canceled, or whether the volume should be imported or exported. In this case, the user need not be concerned about the domain of the tape.
Another administration issue is the accessibility of tape cartridges in a library. In the past, control of a volume serial number (VSN) was provided by an operator or by security programs on a front-end computer. With a library, control of VSNs does not exist; therefore, with the distributed TMF software, any user may request the mounting of any VSN in the domain of the library.
A site may provide access control to VSNs through two user exits. For information on user exits, see the IRIX TMF Release and Installation Guide.
You can use OpenVault, a storage library management facility, as a TMF loader and can configure it on your local IRIX host or a remote one. Figure 3-2, shows OpenVault on the same IRIX host as TMF, and Figure 3-3, shows OpenVault on a different host than TMF.
OpenVault supports a wide range of removable media libraries as well as a variety of drives associated with these libraries. The checklists and sample Perl command script in this section provide information on using OpenVault with TMF. For detailed information on using OpenVault, see the OpenVault Operator's and Administrator's Guide.
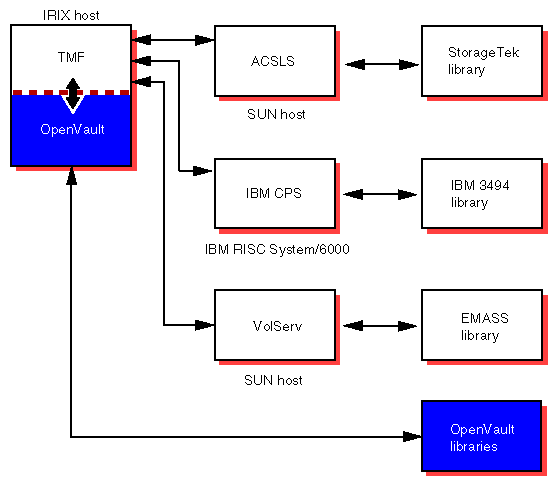
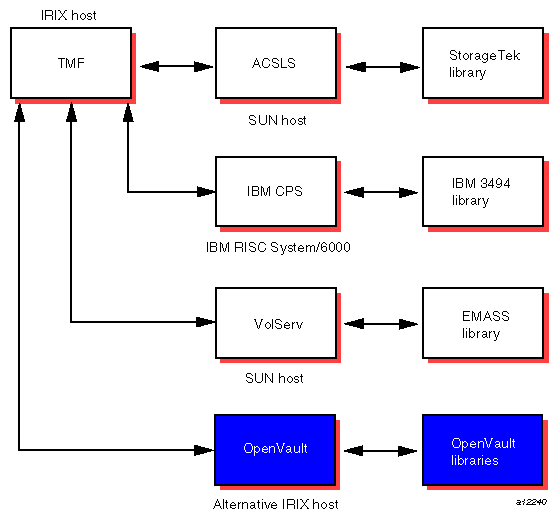
Procedure 3-1, and Procedure 3-2, list the steps you need to take before you use TMF with OpenVault.
Procedure 3-1. OpenVault Checklist
Configure the drives and libraries in OpenVault so that TMF can use them. Ensure that the following steps are taken so that TMF and OpenVault counterparts match.
Use the TMF name for each matching OpenVault drive.
Use the TMF device group name for each matching OpenVault drive group.
For every device group in TMF, there must be a matching drive group in OpenVault containing the same drives.
Make sure that the following line is in the /usr/OpenVault/var/core_keys file:
server_name app_name * language key
For example, if armadillo is the OpenVault server (server_name, the TMF application name ( app_name), is tmf, the language is CAPI, and the security key (key) is not used (none), you enter the following line in the key file:armadillo tmf * CAPI none
Currently, TMF uses CAPI as its language; so you must specify CAPI in the file.
In OpenVault documentation, the terminology may differ: the key file is the key authorization file, the server (server_name) is a host, the TMF application name (app_name) is the client.
Verify that the application name of TMF in OpenVault can use the cartridge groups (groups of tapes) and drive groups (device groups) that TMF uses.
In OpenVault, more than one application may be assigned to a drive; OpenVault will use a drive only if the request comes from an assigned application.
In OpenVault, a drive is a TMF device.
Each drive is assigned to a drive group.
Each drive group is assigned to one or more applications (clients).
In OpenVault, only one application may be assigned to a cartridge; OpenVault mounts a cartridge only if the request comes from the assigned application.
In OpenVault, a cartridge is a physical cartridge (also called a physical tape in TMF).
Each cartridge is assigned to a cartridge group.
Each cartridge group is assigned to an application (a client).
A cartridge is identified by its physical cartridge label (PCL), which is used to identify a cartridge in an OpenVault loader library.
Use the following OpenVault commands to get the application information for the drive groups and cartridge groups:
ov_drivegroup -l '.*' -A '.*'
ov_cartgroup -l '.*' -A '.*'
Use the following commands with the -a option to add tmf, the default TMF application name, to the default drive group (drives) and to the default cartridge group (carts) :
ov_drivegroup -a drives -A tmf
ov_cartgroup -a carts -A tmf
The following four examples illustrate step-by-step how you can use these commands to ensure that the required components in TMF and OpenVault match.
Example 3-1. Applications for All Drive Groups
The following command requests all applications of all drive groups. The output shows that there is only one drive group, SD3, with one application, ov_umsh.
# ov_drivegroup -l '.*' -A '.*'
application          group                group app prio  unload time
ov_umsh              SD3                  1000            60
#
Example 3-2. Addition of TMF Application
The following command adds the tmf application to the SD3 drive group.
# ov_drivegroup -a SD3 -A tmf
Drive-group-application creation:
        Application: tmf
        Group: SD3
#
Example 3-3. Recheck: Applications of All Drive Groups
The following command requests all applications for all drive groups. This command is the same as the one in Example 3-1; the resulting output shows that tmf has been added as an application of the SD3 drive group.
# ov_drivegroup -l '.*' -A '.*'
application          group                group app prio  unload time
ov_umsh              SD3                  1000            60
tmf                  SD3                  1000            60
#
Example 3-4. Applications of All Cartridge Groups
The following command requests all applications for all cartridge groups. The output shows that tmf is already an application of the carts cartridge group.
# ov_cartgroup -l '.*' -A '.*'
application          group                group app prio
ov_umsh              carts                1000
tmf                  carts                1000
#
If you want to change a default, see the /usr/OpenVault/etc/ov_environ file. It contains the environment variables and the default values that you can change.
For example, if the default drive group, cartridge group, and library names are not the names you want to use, you can change these defaults values by setting the following environment variables before you run the OpenVault setup command:
export OVDEFAULTDGROUP=DLT
export OVDEFAULTCGROUP=dlt
export OVDEFAULTLNAME=panther
To collect debugging information in the /usr/OpenVault/var/OVLOG file, enter the following command:
ov_msg -s -t core -m debug
Modify the tmf.config file to support OpenVault in the LOADER statement. For information on the tmf.config file, see the tmf.config(5) man page.
Define a OpenVault loader:
type = OPENVAULT
Specify where the OpenVault server is running by entering the name of the host:
server = host_name
Either use the TMF default (tmf) for the OpenVault application name or specify a different name for TMF with the following parameter:
ov_tmf_application_name = tmf_application_name
Specify the pathname of the key file for TMF if the OpenVault security key is used:
ov_tmf_keyfile = keyfile_path_name
For more information on the key file and security key, see the OpenVault Operator's and Administrator's Guide.
You can also use a Perl script to issue OpenVault commands shown in Example 3-5.
 | Caution: If you decide to use scripts, you should be sure they are doing what you intend. |
Example 3-5. OpenVault Command Script
This script shows the drives on which you may mount a cartridge.
#! /usr/bin/perl -w         require 5.002;
use Socket;
use FileHandle;

$ov_server = `hostname`;
chop $ov_server;
$ov_port = "44444";

# Setup connection to OpenVault server process.
# See "Programming Perl" 2nd ED., page 498, for discussion
# on network programming with Perl.
$iaddr = inet_aton($ov_server) or die "no host: $ov_server";
$paddr = sockaddr_in($ov_port, $iaddr);
$proto = getprotobyname("tcp");
socket(SOCK, PF_INET, SOCK_STREAM, $proto) or die "socket: $!";
connect(SOCK, $paddr) or die "connect: $!";

SOCK -> autoflush();

# Once a connection is made to the OpenVault server
# process, it is treated just like any other file.
# Send initial data to server.
print SOCK "$ov_server\r\ntmf\r\nOnlyInstance\r\nCAPI\r\n0\r\n";

# Get response and ignore it.
# Response should only be 'ok'.
$line = <SOCK>;

# Send 'hello' greeting.
print SOCK "hello client['tmf']instance['onlyInstance']";
print SOCK "language['CAPI']versions['1.0'];\r\n";

$line = <SOCK>;
if (substr($line,0,7) eq "welcome") {
   # 'welcome' is the correct result.
}
elsif ( substr($line,0,9) eq "unwelcome") {
   # The server has rejected us.
   die "Server Not Allowing Request\n";
}
else {
   # Got an undefined answer from server.
   # We should not get here.
   die "Undefined Error\n";
}

# Send 'show' command.
$ov_cmd = "show match[strEQ('123456' CARTRIDGE.'CartridgePCL')]
           report[DRIVE.'DriveName']
           reportmode[value]";
$task_id = " task['66666'];\r\n";
print SOCK $ov_cmd . $task_id;
print $ov_cmd . $task_id;

# Get command 'accepted' from server.
$line = ;
print $line;

# Get command 'success' from server
# along with results.
$line = <SOCK>;
print $line;
# A non-trivial script would parse out the results
# and display it in a more human readable form.

print "Saying Goodbye to OV\n";
print SOCK "goodbye task['1'];\r\n";

# Get command 'accepted' from server.
$line = ;

# Get command 'success' from server.
$line = <SOCK>;

close(SOCK) or die "close: $!";
exit; |
Automatic volume recognition (AVR) is a TMF feature that allows TMF to recognize volumes mounted on drives prior to them actually being requested by applications, and it allows an operator to direct the mounting of tapes to specific devices.
Tape mount messages request that the operator mount a tape on a device in a device group. Upon receiving a message, you locate the tape and choose the device to be used.
The overcommit option is an extension to AVR. It allows you to set the number of outstanding mount requests to a number larger than the actual number of tape devices. It gives you additional flexibility in choosing which request to satisfy and on which device.
| Note: Only those requests that cannot cause a device to deadlock are allowed into the overcommitted request process. |
You may enable or disable the AVR and overcommit options on a global or on a specific device-group basis. Neither option is available to device groups that also contain devices serviced by a tape library (automatic loader).
When a device that has been configured to use AVR is configured up with the tmconfig(8) command, a child process, called tmavr, is created to monitor the device and wait for a volume to be mounted. When tmavr detects a mounted volume, the label and ring status information is sent to the TMF daemon. If tmavr cannot determine the volume label, an operator message is issued for the correct volume information to send to the TMF daemon. The child process waits for the TMF daemon to direct it to exit or look for a new volume to mount.
The message daemon and its associated operator interface provide mount messages for administrators and operators who are loading and unloading tapes. This section provides a brief overview of the daemon and interface.
You must have superuser privileges to start or stop the message daemon.
Start the message daemon prior to starting TMF by entering the following command:
/usr/tmf/bin/msgdaemon |
To stop the message daemon, enter the following command:
/usr/tmf/bin/msgdstop |
Only one message daemon can be running at any time. If you attempt to start the message daemon while it is already running, you will receive an error message.
All messages are logged by the message daemon as they are received. The logs are kept in the msglog.log log file in the /var/spool/msg directory. The /etc/newmsglog shell script, which resides in the /usr/tmf/bin directory, saves the last several versions of the log. The versions are called msglog.log.0, msglog.log.1, and so on, with msglog.log.0 being the most recent. This script also instructs the message daemon to reopen the log file; it should be run from the crontab(1) command.
The message daemon request pipe is located in the /var/spool/msg directory.
Table 3-1 shows the message daemon commands and the permissions required to access them.
Table 3-1. Message Daemon Commands
Command | Permission | Description |
|---|---|---|
msgdaemon(8) | Administrator | Starts the message daemon. |
msgdstop(8) | Administrator | Stops the message daemon. |
oper(8) | Administrator | Invokes the operator display; displays messages. |
msgr(1) | All users | Sends action message to operator. |
The operator display provided by the oper(8) command can be run from any terminal defined in the /usr/lib/terminfo file. It requires at least 80 columns and 24 lines. The three lines at the bottom of the operator display screen are used for input and for running commands that do not display information on the screen. The rest of the screen is used as a refresh display to display messages and to run other display commands.
The $HOME/.operrc configuration file lists the commands to be run as refresh displays and those that require full control of the screen. $HOME is the user's home directory. If this file does not exist, the default configuration file, /usr/tmf/version/oper.rc, is used.
Commands not listed in the configuration file are assumed to be nondisplay commands, which are also called action commands.
Table 3-2 describes two of the action commands available from the operator display:
Table 3-2. Operator Action Commands
Command | Description |
|---|---|
msgd(8) | Displays action messages. |
rep(8) | Replies to action messages. |
Action messages that require replies from the operator are primarily tape mount messages, but they may be other types of messages to which users need responses. These messages are logged by the message daemon. An action message is deleted when the operator replies to it or the sender cancels it.
You can start and stop TMF automatically or explicitly.
Installing TMF does not enable starting TMF automatically at system startup. To enable automatic startup of TMF and the message daemon, execute the following chkconfig(1m) command as root:
chkconfig -f tmf on |
To stop TMF from starting automatically at system startup, execute the following as root:
chkconfig -f tmf off |
If you chose not to use the chkconfig(1m) command, you can start and stop TMF with the tmdaemon(8) and tmstop(8) commands. You can also use these commands to stop and start TMF once it has been started automatically when the system is booted.
To start TMF explicitly, enter the following tmdaemon(8) command:
/usr/tmf/bin/tmdaemon |
Options exist for the tmdaemon(8) command. For descriptions of these, see the tmdaemon(8) man page.
TMF is stopped by the following tmstop(8) command:
/usr/tmf/bin/tmstop |
The tmstop(8) command has no options.
Table 3-3 shows these commands and the permissions required to access them.
Command | Permission | Description |
|---|---|---|
tmdaemon(8) | Administrator | Starts TMF. |
tmstop(8) | Administrator | Stops TMF. |
When you use the xfsdump(1m) command to dump files to tape, the command uses 262144 as the block size. As a result, you must issue the tmmnt(1) command with the -v option set to the number of volumes needed and the -b option set to 262144, which is 2^18.
When you are using TMF, xfsdump(1m) knows nothing about end of volume. If you expect the dump to occupy more than one tape volume, you must specify the volumes on the tmmnt(1) command with the -v option. If you specify multiple volumes, you do not really know how many xfsdump(1m) will use.
If you do not specify enough volumes to hold the dump, you will receive an error message. If this happens, you can restart the dump by issuing another tmmnt(1) command with the -b option set to 262144 and with additional volumes specified on the -v option. Then you enter a xfsdump(1m) command with the -R option to resume the interrupted dump session.
To restore tape files from dumps produced by xfsdump(1m), use the xfsrestore(1m) command.