This chapter provides information about utility programs included on the CD-ROM shipped with the IEEE 1394 option board. These utilities provide information about attached IEEE 1394 peripheral devices and also permit you to transfer video and audio information to and from attached IEEE 1394 Digital Video (DV) devices.
If you have not yet installed the software, do so now. Refer to “Installing the Software”.
 | Note: All software instructions included in this section are based on the IRIX 6.5.2 operating system. If you have upgraded to a subsequent operating system, some of the instructions may no longer be valid. If this is the case, check the latest information by using the online documentation that came with your new software. |
To display all devices on the IEEE 1394 serial bus that are attached to an O2 workstation:

The DVLink utility allows you to communicate over the IEEE 1394 cable with video devices such as cameras and decks. The utility provides a preview window, deck controls, and the ability to record digital video (DV) to and from video devices.
DVLink provides a graphical user interface with simple controls.
To start the DVLink utility, from a shell prompt, enter dvlink.
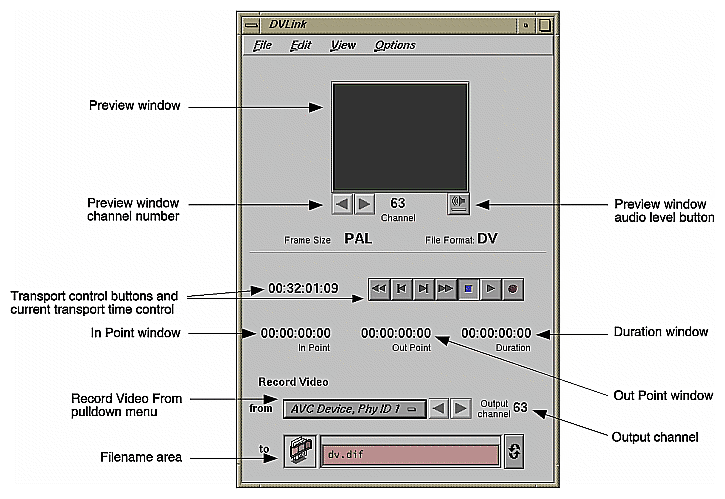
DVLink options and controls include:
Preview window. The preview window shows video as transmitted from the video device. It is always active, and automatically switches between NTSC and PAL to display the format of the received video.
Preview window channel number 0-63. If you have one video device, it will operate on channel 63 by default and DVLink will automatically talk to it. If you have multiple video devices attached to your IEEE 1394 option card that send video data over different channels, you may select between them by changing the channel number using the increase or decrease buttons. Also note that if you have multiple devices, you may run multiple copies of DVLink with each previewing a particular channel.
Preview window audio level button. Click to adjust the audio level you hear from the video source. Output goes to the default audio device. If the audio level is set to the lowest setting, audio decoding is turned off, reducing the CPU load. The audio level may also be set from the apanel utility.
Transport control buttons and current transport time control. The buttons control attached video devices over the IEEE 1394 interface, and the current transport position shows the tape location as reported by the video device over the IEEE 1394 interface. It is also possible to send an AVC Search command by typing the time code into the tape transport position directly.
The In Point window. Used to specify the starting point for a capture from tape. The time units are hours:minutes:seconds:frames.
The Out Point window. Used to specify the ending point for a capture from tape
The Duration window. Shows the duration for a capture or record operation. You may use the In Point, Out Point, and Duration windows for input of any of these values, with the others updated automatically.
The Record Video From pulldown menu. Allows you to choose one of the devices currently plugged into the IEEE 1394 interface. Even with nothing attached to the computer, you will see the O2 IEEE 1394 interface as one device. When you attach a video device, you will have the option of choosing between the AVC Device and the Phy ID device. If you have more than one video device attached, you may select the one you want from this menu. Be sure to select an AVC device for proper operation.
The Output/Input Channel. Defaults to 63 with one video device attached, and may be changed using the increase or decrease buttons to select another video channel number. Note that a device transmits video on one channel, and all other devices on the bus can receive it if selected to that channel.
While in the Video to Disk record mode, you may change the Output channel of the AVC device that is playing. This allows playing multiple VCRs at the same time with preview or capture of particular channels by running multiple copies of DVLink.
Likewise, while in the Video to Tape record mode you may set the Input channel of the video device, that is, the channel on which the AVC device should listen for a DV stream.
Note: The performance of Video to Disk and Video to Tape are heavily dependent on the available system resources and system configuration. In the Video to Tape record mode, pressing the record button sends the record command to the remote VCR or camcorder. To record the video file onto the tape, press the play button before or after the record button is pressed. Filename area. Used to select a filename for Record Video to Disk, Frame to Disk and Video to Tape. Recently used filenames may be recalled with the recall button to the right of the filename.
The DVLink menus allow user control over various details of the capture and export process.
You can eject a tape from an attached video device by using the Eject option under the File menu. Note that some consumer devices may not implement the remote eject control function. You may also exit from the DVLink program by using the Exit option under the
File menu.
You may clear (zero) all the timecode input fields by using the Clear All option under the Edit menu.
Under the View menu you may launch several auxiliary utilities:
The Device Tree program (ieee1394tree), which shows a graph of attached IEEE 1394 devices.
The Audio Panel (apanel), which is used to control audio devices such as selecting default input and output interfaces and setting the audio output level.
The Movie Player utility (movieplayer), which is used to play back movie files.
The View menu also contains a submenu to select time units. The choices include display time as:
Timecode (hours, minutes, seconds, frames)
Count of frames
Seconds and fractions
Under Options you may select the type of record mode. There are four choices:
Video to Disk: Record from an attached video device to a computer disk file.
Frame to Disk: Record just one frame to a computer disk file from an attached video device.
Video to Tape: Copy a computer video file to the tape in an attached video device.
The Convert to DV option remains grayed out until users specify a file to be exported using the option Video to Tape and a movie file that is not in the DV format. In this case, you will be prompted when trying to play the file that the file is not DV and may then specify the Convert to DV option under the Options menu.
Link Channels: If selected, the preview and Output/Input channel of the attached device are linked; that is, if one is changed the other changes too. The default is unlinked, allowing preview on one channel while capturing or recording to another channel.