This flier provides information about installing an R12000 or R12000A CPU and any necessary software in an O2 or Octane system. This upgrade is applicable only to systems with an R10000 or R12000 CPU already installed.
 | Caution: These instructions supersede those found in the O2 Workstation Owner's Guide and the Octane Workstation Owner's Guide. If you're upgrading an O2, it's especially important that you complete the replacement of the CPU support prior to installing the R12000A module or your CPU will be damaged during it's installation |
Included in this shipment are the following items:
6.5.x[1] Overlay CD
Wrist strap
Reversible screwdriver
R12000 or R12000A CPU processor module
CPU support (P/N 050-0347-002) for use with the O2 R12000A only
Upgrade label
Make sure you install the software before installing the hardware. You must have IRIX 6.5 base software installed to be able to install the Overlay IRIX 6.5.x software. For this upgrade, use the IRIX Overlay CD that shipped with this R12000 CPU hardware.
 | Note: IRIX 6.5 base software does not ship with the processor upgrade. Contact your local sales representative to order the base IRIX 6.5. |
To check your workstation's IRIX version, from the Toolchest > Desktop, open a UNIX shell.
At the prompt, enter
uname -aR
To install the software, follow the instructions in the software installation booklet that came with your CDs.
For instructions on installing the R12000 processor, refer to the appropriate document:
To install the R12000 in an O2, follow the instructions for replacing the R10000 CPU module in the O2 Workstation Owner's Guide, Chapter 5, “Ordering, Removing, and Installing Replacement Parts”. This information is also found in Chapter 5 in the online O2 Workstation Hardware Reference Guide.
To install the R12000A in an O2, see the instructions in the following section, “Installing the R12000A in an O2”.
To install the R12000 or R12000A processor in an Octane, see the Octane Workstation Owner's Guide, Chapter 2, “Installing and Removing the CPU and Memory”.
When you have completed the CPU installation, see “Attaching the Upgrade Label”.
To replace an R10000 or R12000 CPU module with an R12000A CPU module, follow these steps.
To remove the R10000 or the R12000 CPU module, you must first remove the plastic face plate of the system module and the PCI tray.
If you haven't already done so, turn off the workstation, remove the power cable, and remove the system module from the chassis.
Remove the plastic face plate from the system module:
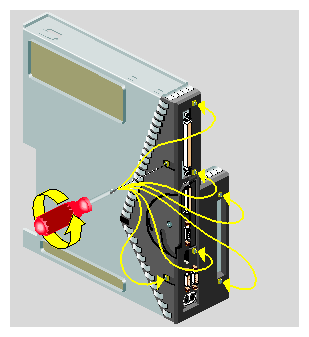
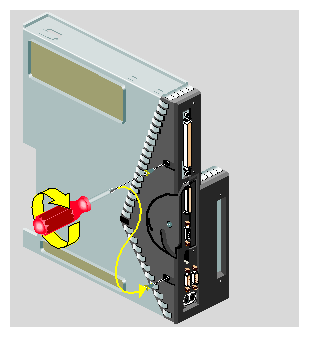
Use a Phillips screwdriver to remove five screws on the rear and two screws on the underside, in the locations shown (Figure 1-1). Keep the two screws from the underside separate. When reinstalling the faceplate you must use the same screws.
Caution: On the underside, remove only two screws. Do not remove the third screw that attaches the lever to the face plate.
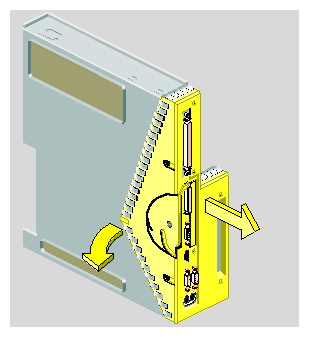
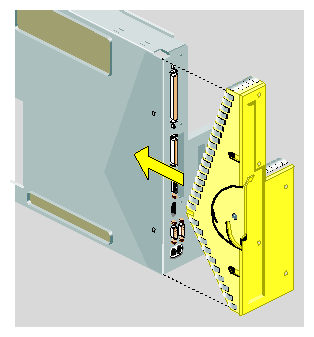
Remove the faceplate by grasping it where the plastic comes to a “V” and pulling it outward (Figure 1-2).
There is a filler panel covering the I/O port which falls away as you remove the face plate.
Release the PCI tray from the system module as follows. If a PCI board is installed in the tray, do not remove it from the tray. However you need to disconnect any cables attached to the PCI board.
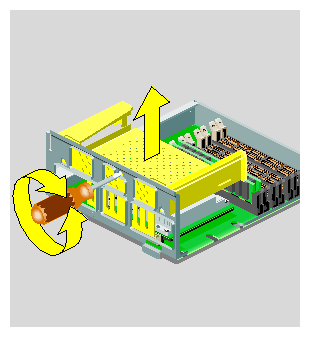
Insert a screwdriver in the small opening shown in Figure 1-3. Use a twisting motion to release the PCI connector from the slot on the system module. Then use an up and down motion to release the PCI tray.
Pull the PCI tray straight up to remove it and set it aside.
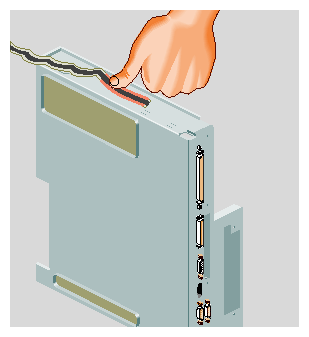
Before touching any of the components, ground yourself to a metal part of the chassis. Attach the wrist strap as follows: (Figure 1-4)
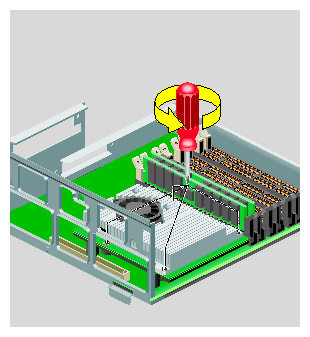
Locate the R10000 or R12000 CPU module. It is protected by a metal heat sink (Figure 1-5). Do not remove the heat sink.
Use a Phillips screwdriver to remove four screws from the locations shown in Figure 1-5.
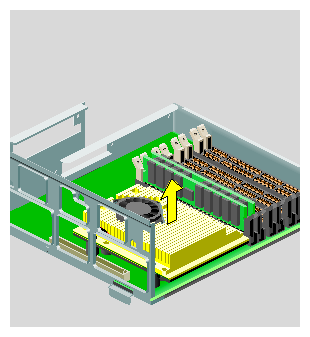
Caution: Do not remove the four hex screws. Do not remove the two screws that secure the fan. Grasp the CPU module on both sides and gently rock it out (Figure 1-6). Do not exaggerate the rocking motion, or you will bend the pins. Set the CPU module aside.
Use the Phillips screwdriver to remove the top two screws securing the clear plastic CPU support to the system module (Figure 1-7).
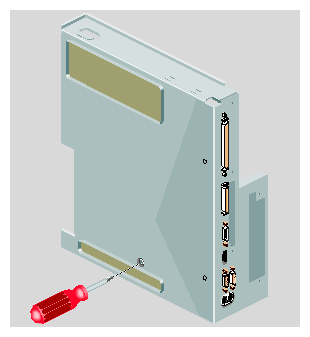
Turn over the system module and use the Phillips screwdriver to remove the third screw securing the CPU support in place (Figure 1-8).
Note: If the system module does not have a hole in the sheet metal to access this screw, call your nearest SGI Customer Support Call center and report the nature of the problem. Remove the CPU support and set it aside.
Insert the new CPU support in the system module as shown in Figure 1-9. The new CPU support can be distinguished from its predecessor by its gray color or by the part number 050-0347-002 embellished on it.
Reinsert the two screws from the top to secure the CPU support into place.
Reinsert the bottom screw to secure the CPU support into place as shown in Figure 1-10.
Install the replacement R12000A CPU module as shown in Figure 1-11.
Align the screw holes on the CPU module with the screw holes on the CPU support. Make sure it is positioned correctly before pressing down.
Press down gently on the CPU module until it is securely seated.
Insert and tighten the four Phillips screws in the locations shown.
Remove the wrist strap.
Replace the PCI tray in the system module as follows:
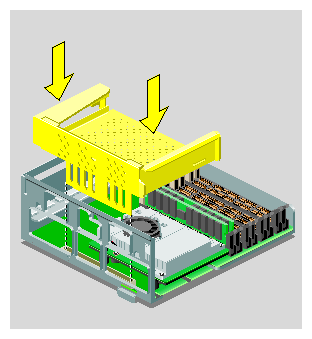
Lower the PCI tray, engaging it on the metal rear panel of the system module (Figure 1-12).
Insert the PCI connector beneath the tray into the slot on the system module.
Once the connector is aligned, push down firmly until it is completely seated.
Note: If the PCI tray is not completely seated, the system module will not slide back into the chassis.
Replace the faceplate by sliding it onto the system module, while at the same time lifting slightly at the “V” to snap it in place (Figure 1-13).
When properly seated, the underside of the faceplate is flush to the module and the screw holes are aligned.
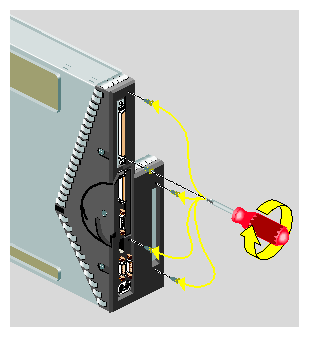
Align the screw holes on the faceplate with the screw holes on the system module. Use a Phillips screwdriver to insert and tighten two screws on the underside in the locations shown (Figure 1-14).
Replace the filler panel over the I/O opening on the inside of the module. It snaps into place. If it doesn't seem to fit, turn it 180 degrees and try again.
Use a Phillips screwdriver to insert and tighten five screws in the locations shown in Figure 1-15.
See the section, “Reinstalling the System Module,” in Chapter 5, “Ordering, Removing, and Installing Replacement Parts,” in either the O2 Workstation Hardware Reference Guide or the O2 Workstation Owner's Guide.
Ship the original CPU module to Silicon Graphics in the container that held the replacement CPU module.


Attach the Octane upgrade label to the system label on the back of the workstation.
Attach the O2 upgrade label near the system label on the bottom of the workstation.
If your workstation does not boot after installing the CPU, reread the CPU installation instructions. Check to make sure the new CPU is correctly seated. If you mistakenly installed the new R12000 CPU before installing the software, follow these steps (refer to your owner's guide for instructions):
Remove the new CPU module.
Reinstall the old CPU module.
Install the software.
Remove the old CPU module.
Install the new CPU module.
If you need further help to troubleshoot the installation, see your owner's guide. If necessary, contact your local authorized service provider.
[1] “The Overlay version of IRIX 6.5 software that you received with this shipment. Overlay software is labeled “IRIX 6.5.x, “x” referring to the current numbered version of the software, for example 6.5.3. Base software is referred to as IRIX 6.5.