The Installation Poster shipped with your Silicon Graphics 320 or Silicon Graphics 540 visual workstation illustrates the procedure for physical installation. The Owner's Guide describes starting up and shutting down your visual workstation and adding or replacing hardware components.
This guide describes the procedures for setting up Windows NT and Silicon Graphics system software for the first time and for reinstalling system software later. Use this guide as your primary resource when installing, reinstalling, or upgrading Windows NT and Silicon Graphics system software.
For basic information about Windows NT, refer to Part 1 of Start Here, the Microsoft Windows NT Workstation guide shipped with your visual workstation.
Silicon Graphics offers a wide range of support services. Warranty upgrades and support contract services include operating system support packages; onsite maintenance; and Supportfolio Visual Workstation, an online tool for finding answers to frequently asked questions and other technical support information. You can also enroll in education classes or purchase consulting services for more complex service needs.
A detailed description of these services is available online at http://www.sgi.com/visual/support.
Supportfolio Visual Workstation, which provides technical assistance through the Web, is available at
http://support.sgi.com/nt.
To contact Silicon Graphics customer support services in your area, use the following numbers:
Country | Phone number |
|---|---|
Argentina | +31 3465-97201 |
Australia | 1800-818-549 |
Austria | 0800-201705 |
Belgium | 02-6790052 |
Brazil | 0008140-550-3510 |
Canada | 800-800-4744 |
Chile | 1230-020-2327 |
China | 10-800-120-0117 |
Colombia | 980-15-4537 |
Denmark | 043-270428 |
Finland | 0-800-1-19629 |
France | 01-3488 8888 |
Germany | 0130 112 550 |
Greece | 00800-12-5137 |
Hong Kong | 852-27843136 |
India | +61 (0)2 6221 6524 |
Indonesia | 001-803-011-2502 |
Ireland | 0870-60744744 |
Israel | 1-800-9203088 |
Italy | 1678-23183 |
Japan | 0120 458 901 |
Korea | 82-2-222-7373 |
Malaysia | 1-800-80-3226 |
Mexico | 52-5-267-1370 |
Netherlands | 030-669-6700 |
New Zealand | 0800-4744-4357 |
Norway | 6711-4601 |
Peru | +31-3465-97201 |
Spain | 900-234432 |
Sweden | 08-4700090 |
Switzerland (French) | 0800-804021 |
Switzerland (German) | 0800-804022 |
Thailand | 001-800-12-0662980 |
United Kingdom | 0870-60744744 |
United States | 800-800-4744 |
Venezuela | 8001-2509 |
In all other countries, please contact your local Silicon Graphics representative.
To facilitate the setup process, Silicon Graphics recommends that you gather the following information and record it in the space provided before you begin the procedure:
| |
Your name: |
|
Organization name: |
|
Computer name: |
|
Domain name: |
|
|
Your Windows product ID number is the 20-digit number printed on the front cover of the Microsoft Start Here guide. In Microsoft documentation, the product ID number is sometimes referred to as the “Certificate of Authenticity” number.
If your visual workstation will be connected to a TCP/IP network that does not use DHCP to dynamically assign IP addresses, you need the following additional information:
| |
Your subnet mask: |
|
Network's domain name: |
|
IP addresses of your network's Domain Name Service (DNS) servers, if any: |
|
IP addresses of your network's Windows Internet Name Service (WINS) servers, if any: |
|
If you are not certain of the correct computer name, domain name, transport protocol, or IP addresses, consult your network administrator.
In addition, you should have a blank diskette available to create an emergency repair disk at the end of the Windows NT setup procedure.
The first time you power on your visual workstation, the Windows NT Setup Wizard starts automatically and guides you through the process of configuring Windows NT for your network environment. Follow these steps:
Power on any external, separately powered peripherals, such as monitors or drives, that are connected to the visual workstation.
Power on the visual workstation system unit.
A sequence of startup messages appears on the monitor. The Windows NT Setup Wizard displays its startup screen and begins prompting you for information.
Follow the instructions given by the Setup Wizard. Except for fields in which you are required to enter user-specific or site-specific information or options, accept the default values provided by the Setup Wizard.
The Setup Wizard displays progress messages as it copies files to the hard drive and installs a Windows NT Service Pack.
Follow the Setup Wizard's instructions in the Regional Settings screen, the Keyboard Settings screen, and the Date and Time screen.
After these screens close, the installation process runs for several minutes without displaying a progress bar or other indication that the installation is continuing normally. This is not a cause for concern. Do not press any keys while this operation is in progress. Wait until Setup completes this phase of the installation.
The Setup Wizard displays progress messages as it copies files to the hard drive, removes temporary files, and saves configuration information. These operations take several minutes. After they finish, the Setup Wizard restarts the visual workstation.
In the login dialog box, log in as Administrator. By default, no password is required for the Administrator account.
The Welcome to Windows NT screen appears, then Windows NT installs and sets up Internet Explorer. This process takes several minutes.
After the setup process completes and the Windows NT desktop appears, insert a blank diskette in the diskette drive (usually drive A).
Choose Start > Run. In the Run dialog box, enter the command rdisk and click OK.
In the Repair Disk Utility dialog box, click Create Repair Disk.
When the Repair Disk Utility completes, remove the diskette from the drive, label it appropriately, and store it in a safe place.
The Repair Disk contains compressed copies of several critical Windows NT system files, including the information you supplied to customize Windows NT to your network environment. You can use the disk to repair your visual workstation if the hard disk becomes corrupted.
Create a new emergency repair disk each time you install software or make configuration changes to your visual workstation. This ensures that the disk contains up-to-date information and settings.
The Silicon Graphics visual workstation CD set is not required when you set up Windows NT and Silicon Graphics system software for the first time. They are required if you need to reinstall the system software later. In addition, you may wish to install some of the optional applications on the CDs.
 | Note: The Silicon Graphics visual workstation CD set is the only source of system software for your visual workstation. Windows NT system software from another computer vendor or from Microsoft does not install and operate correctly on the visual workstation. In addition, you must obtain Windows NT Service Packs and hot fixes from Silicon Graphics. |
The CD set includes the following CDs:
Recovery CD 1 and Recovery CD 2 contain the Windows NT system software, Silicon Graphics custom drivers, and required applications. Use these CDs to reinstall system software. See “Reinstalling System Software” for information.
CDs containing optional software for managing your visual workstation in an enterprise environment, Internet tools, and try-before-you-buy copies of optional interoperability tools. See “Reinstalling Optional Applications” for information on installing software from these CDs.
Visual Explorations contains an interactive 3D system tour, 3D graphics demonstrations, a visual computing media gallery, and an interactive 3D graphics tutorial. See “Reinstalling Optional Applications” for information on installing software from this CD.
In certain circumstances, you may need to reinstall the visual workstation operating system, along with other system software components. These circumstances include:
Upgrading your visual workstation with additional processors. If you upgrade from a single processor to multiple processors, the upgrade requires you to reinstall the system software so that it recognizes the new processor(s). However, if your visual workstation already has two or more processors, adding another processor does not require reinstallation of the system software.
Repairing or reformatting a damaged system disk. If the disk from which the visual workstation boots fails or if system files become corrupted, you must reinstall some or all of the system software. This procedure allows you to repair system files or to completely reformat the system disk.
The reinstallation process consists of five separate procedures:
“Before You Begin” describes preparations for reinstallation.
“Reinstalling Windows NT” describes reinstalling the Windows NT operating system and Silicon Graphics system software from Recovery CD 1.
“Reinstalling Drivers and Auxiliary Applications” describes reinstalling software from Recovery CD 2.
“Reinstalling Optional Applications” describes reinstalling software from the CDs containing optional tools and applications.
“Restoring Other Data and Applications” describes restoring user data and other applications from backups.
Complete each procedure before continuing to the next.
| Note: If you are upgrading the system software after adding processors to your visual workstation, skip procedures 4 and 5. However, if you choose to completely reinstall the system software, you must perform procedures 4 and 5. |
Before you begin the reinstallation procedure:
Back up all files on accessible partitions.
Locate your Silicon Graphics visual workstation CDs. You need Recovery CD 1 and Recovery CD 2 to reinstall all the required software components. In addition, you may wish to reinstall software from the CDs containing optional tools.
| Note: Verify that you have the correct CDs. You must use the Silicon Graphics CDs. Windows NT system software obtained from another computer vendor or from Microsoft does not run on a Silicon Graphics visual workstation. |
Refer to pages 6 and 7 for the information you must provide to configure Windows NT for your network environment.
If you are reinstalling Windows NT following a disk failure or file corruption, and you plan to repair the disk rather than reformat it and reinstall the system software, locate the latest Emergency Repair disk that you created (see page 9).
The procedure consists of two phases:
The first phase uses a text-based interface, which gathers hardware information about your visual workstation and copies system files to it. At the end of this phase, the Setup utility prompts you to restart your visual workstation and then automatically continues to the next phase.
The second phase uses the Setup Wizard's graphical user interface to gather site-specific information and customize Windows NT for your network environment.
Silicon Graphics strongly recommends that you accept the default values supplied throughout the Setup program, and that you create an emergency repair disk after completing the reinstallation and restarting the visual workstation.
Follow these steps to upgrade or reinstall Windows NT:
Start your visual workstation.
Press the Esc key within a few seconds after the first startup messages appear on the monitor (a progress bar tells you how much time has elapsed). The system firmware displays the main screen, as shown on page 16.

Click the Install System Software button. The Setup utility starts automatically.
When prompted to do so, insert Recovery CD 1 into the CD-ROM drive and click the Continue button.
A dialog box asks you to specify the disk partition in which to install the system loader files. Use the arrow keys on the Disk list box to select a disk and the arrow keys on the Partition list box to select a partition.
The disk partition you specify here need not already exist. However, if it does not already exist, you must create it during step 14 of the procedure.
See “Partitioning the System Disk” for more information about visual workstation disk partitions.
Click the Accept button to continue. This starts the Windows NT Setup program.
The Mass Storage Device screen lists the mass storage device drivers to be installed during the Setup procedure. Typically, only the CD-ROM drive is listed. This is normal. IDE drives are automatically detected.
Press the Enter key to continue. The installation program loads some files it needs for the installation. This may take several minutes.
In the Welcome to NT Setup screen, you must decide whether to repair the existing Windows NT installation or to reinstall Windows NT.
If you wish to repair Windows NT using the information on your emergency repair disk, press the R key. Follow the instructions given by the Setup program, and restart your visual workstation when prompted to do so.
If you wish to reinstall Windows NT, press the Enter key. Continue with steps 9 through 20 of this procedure.
The Mass Storage Device screen lists any mass storage devices that the firmware detects. Press the Enter key to continue.
In the License Agreement screen, read the end-user license agreement (press the Page Down key to scroll to the bottom of the screen). To agree to the license agreement, press the F8 key.
If Setup detects an existing copy of Windows NT, you are asked if you wish to upgrade the existing copy or install a fresh copy:
If you are reinstalling Windows NT after adding processors to your visual workstation, press the Enter key to upgrade the existing copy. Follow the instructions given by the Setup program, and restart the visual workstation when prompted to do so.
If you wish to reinstall a fresh copy of Windows NT, press N. Continue with the rest of this procedure.
The Hardware Components screen lists the visual workstation hardware components. Press the Enter key to continue.
The Verifying Partitions screen lists the existing partitions on the system disk. Press the Enter key to continue.
The Reformat Partitions screen offers you the option to reformat the partitions on the system disk.
If you are reinstalling the system software after adding a processor to your visual workstation, leave the existing partitions as they are. Press the Enter key to continue.
If you wish to reformat the system disk, use this screen to reformat the partitions according to the recommended partitioning scheme described in “Partitioning the System Disk”.
Please be aware of the following considerations when creating partitions:
The disk partitions are numbered in the order that they were created (that is, Partition 1 is the first partition created on a disk and Partition 2 is the second partition created on the same disk).
If it does not already exist, you must create the partition that you specified as the System Loader partition in step 5. This partition must be at least 20 MB in size, and must be formatted with the FAT filesystem.
The partitions are formatted as you create them. The maximum size permitted by the Setup program is 4095 MB.
Partitions you specified as NTFS filesystems are displayed by the Setup program as FAT partitions after formatting. This is not a cause for concern. The Setup program converts these partitions to NTFS later in the installation process.
After you have created all the partitions you need, use the Up and Down arrows to select the disk partition in which you want the Operating System files to be installed, then press the Enter key.
The System Folder screen lists the directory in which to install Windows NT. The default is \WINNT. Press the Enter key to continue.
The Examine Hard Disk for Corruption screen asks if you wish to perform a check of the system disk. Press the Enter key to perform a disk check. This process takes up to several minutes, depending on the size of the system disk.
Setup copies files from the CD to the system disk. Do not press any keys while the copy operation is in progress. Wait until Setup completes this phase of the installation.
Press the Enter key to restart the visual workstation. After the visual workstation restarts, the Setup Wizard starts automatically and begins prompting you for information.
This portion of the procedure is similar to the initial setup procedure (see “Setting Up Windows NT for the First Time”).
Follow the instructions given by the Setup Wizard. Except for fields in which you are required to enter user-specific or site-specific information or options, accept the default values provided by the Setup Wizard.
The Setup Wizard customizes the system software and copies files. When the installation is complete, remove any diskettes or CDs from their drives, and click the Restart button to restart the visual workstation.
This procedure reinstalls drivers and applications that are required for proper operation of your visual workstation, as well as online documentation.
Make sure you are logged in to the Administrator account on your visual workstation.
Insert Recovery CD 2 in the CD-ROM drive. The Setup utility on the CD starts up automatically.
Follow the instructions on the screen. At the end of the initial installation sequence, Setup prompts you to restart the visual workstation. Leave Recovery CD 2 in the CD-ROM drive and restart the visual workstation.
Choose Run from the Start menu. In the Run dialog box, enter E:\yamaha\disk1\setup.exe (assuming E: is the drive letter of your CD-ROM drive).
Accept all defaults during the installation of the Yamaha Synthesizer.
At the end of the installation sequence, Setup prompts you to restart the visual workstation. Remove Recovery CD 2 from the CD-ROM drive and click the Restart Now button. Restarting ensures that the system initializes the Yamaha Synthesizer.
If you have previously installed optional components from the CDs containing optional tools and applications, reinstall them now.
Make sure you are logged in to the Administrator account on your visual workstation.
Insert the appropriate CD in the CD-ROM drive. The Install program on the CD starts up automatically.
In the main screen, click the button for the optional component you wish to install, and follow the instructions as the Setup Wizard installs the software.
If prompted to restart your visual workstation, remove the CD from the CD-ROM drive and click the Restart button. Restarting ensures that the system initializes the new software.
Service Packs contain patches and updates to the Windows NT system software. The system software that is preinstalled on your visual workstation includes a Service Pack. If you make hardware configuration changes to your visual workstation, such as adding peripherals, or install applications or system services, you should reapply the Service Pack to install the latest drivers and patches for the new hardware, software, or system service.
| Note: You cannot use a Service Pack CD from Microsoft or from another computer vendor. You must reinstall Service Packs from the Silicon Graphics Recovery CD 1. |
Follow these steps to reinstall the Service Pack:
The system disk is partitioned at the factory into two partitions. The visual workstation requires two partitions to boot Windows NT. The system firmware must load an executable (arcldr.exe) from a FAT partition in order to load the rest of the operating system from another partition. Changing partitions or moving system files without reconfiguring the system firmware can prevent the visual workstation from booting successfully.
Silicon Graphics strongly recommends that you accept the default partitions during the Windows NT Setup procedure.
If you wish to partition the drive differently at a later time, you may do so, with some restrictions:
You must create at least two partitions.
The second partition must be at least 20 MB in size, and must be formatted using the FAT filesystem.
This partition is where the boot files reside. The system firmware is able to find and execute boot files in a FAT partition, but not in an NTFS partition.
The remaining partition(s) may be any size appropriate to your needs, and may use either FAT or NTFS filesystems.
| Note: If you reformat using the Setup program, the maximum partition size is 4095 MB. If you reformat using the Disk Administrator, this restriction does not apply. |
The system disk may be partitioned a bit differently at the factory. However, these are the most basic requirements. The table below lists partition requirements for systems that boot from an IDE drive and systems that boot from a SCSI drive.
| IDE Boot Drive | SCSI Boot Drive |
|---|---|---|
Operating system partition | IDE 0, Disk 0, Partition 1 | SCSI 2, Disk 0, |
Filesystem | NTFS | NTFS |
Size | 4095 MB maximum | 4095 MB maximum |
System loader partition | IDE 0, Disk 0, Partition 2 | SCSI 2, Disk 0, |
Filesystem | FAT | FAT |
Size | 20 MB minimum | 20 MB minimum |
Directory Location for Windows NT | \WINNT | \WINNT |
 | Caution: By default, Windows NT operating system files are located in the first partition on the boot disk and system loader files are located in the second partition on the boot disk. System Loader files include hal.dll, arcldr.exe, and arcsetup.exe. If you move these files to different partitions, you must configure the system firmware appropriately or the visual workstation cannot boot successfully. See “Startup Settings” for more information. |
Some applications, such as graphics-intensive games or heavily textured screen-savers, may require that more memory be allocated to the graphics hardware than is configured at the factory. Some symptoms indicating that an application needs more graphics memory include graphics that display in monochrome instead of color, and 3D graphics that display as wireframes instead of solids.
Follow these steps to increase the amount of system memory allocated to the graphics hardware:
Choose Start > Settings > Control Panel.
In the Control Panel window, double-click the Display icon.
Click the Silicon Graphics Settings tab.
In the Graphics Settings and Memory Reservation Profile panel, select the preset memory configuration from the list box that matches your graphics application's needs. The System Memory panel at the bottom of the window displays the memory allocation for that configuration.
Click the OK button to accept the new memory allocation and close the Properties window, and click the OK button in the Display Properties window.
If prompted to do so, restart your visual workstation.
Try your application with the new graphics memory allocation. If the application still needs more graphics memory, create a customized graphics memory profile using these steps:
Choose Start > Settings > Control Panel.
In the Control Panel window, double-click the Display icon.
Click the Silicon Graphics Settings tab.
In the Graphics Settings and Memory Reservation Profile panel, select the preset memory configuration in the list box that most closely meets your needs.
Click the Copy button to create a duplicate of the selected memory configuration. In the Copy Profile dialog box, enter the name of the new memory configuration and click the OK button.
Click the Properties button to open the Properties window.
Use the Graphics Memory Allocation panel to allocate additional memory for graphics hardware.
You can do this in either of two ways:
Use the Up and Down arrows to select one of the preset values in the list box.
Highlight the existing value displayed in the list box, and type a new value in its place.
Notice that the amounts of memory listed in the System Memory panel change as you adjust the Graphics Memory Allocation value. The value labeled Maximum Available to Graphics Hardware is the upper limit that you can specify. This value represents the total amount of available memory minus 64 MB (Windows NT reserves 64 MB for use by the system software).
Click the OK button to accept the new memory allocation and close the Properties window, and click the OK button in the Display Properties window.
If prompted to do so, restart your visual workstation to initialize the system using the new graphics memory allocation.
Try your application again, and fine-tune the graphics memory allocation if necessary.
The System control panel contains information about your visual workstation that is useful if you need to contact Silicon Graphics for technical support.
Choose Start > Settings > Control Panel. In the Control Panel window, double-click the System icon. You can also display the System control panel by right-clicking the My Computer icon on the desktop and selecting Properties.
The General tab in the System control panel displays the version numbers of the system firmware and Windows NT, as well as your Windows NT product ID number. The illustration below shows an example of the information on the tab.
Be sure to write your product ID number on page 6 of this guide.

Click the Support Information button to display information about how to contact Silicon Graphics for technical support.
You can display important information about your visual workstation via the Start menu on the Windows NT task bar. To access this information, choose Start > Silicon Graphics. In the Silicon Graphics menu, you can select any of the following options:
Hardware Overview displays a visual overview of the hardware and specifications of your visual workstation.
Online Books displays the contents of the Owner's Guide and the Audio/Video User's Guide.
Support displays information about how to get technical support from Silicon Graphics.
Release Notes displays the release notes that apply to your visual workstation hardware or software.
Visual Demos allows you to try out third-party software from the visual workstation CDs or demonstration software installed on your system disk.
The system firmware provides a graphical user interface for configuring several system options.
Follow these steps to access the system firmware user interface:
The main screen contains the following buttons:
Start System boots the workstation using the current settings.
Startup Settings displays a secondary screen in which you may view or modify boot configuration options. See “Startup Settings” for a description of the available options.
System Settings displays a secondary screen in which you may view or modify system settings. See “System Settings” for a description of the available settings.
Install System Software allows you to install system software from CD. See “Reinstalling System Software” for a description of the procedure.
Run System Utilities displays a secondary screen in which you may upgrade the system firmware or invoke system utilities. This screen is intended for use by advanced users only.
Hardware Inventory displays a list of all the visual workstation hardware components detected by the firmware. Use the Up and Down buttons to navigate through the list.
| Caution: This screen is intended for use by advanced users only. Adjusting values in this screen incorrectly can prevent your visual workstation from starting up successfully. |
The Startup Settings screen contains two main areas and several control buttons. An example of this screen is shown on page 39.
The Boot Selection area lists boot configurations. When you start up your visual workstation initially, several configurations are available.
Use the up and down arrow buttons to select the configuration you wish to view or modify.
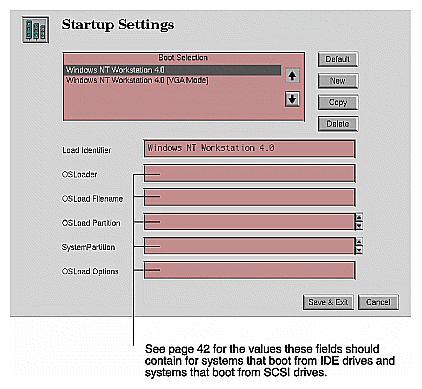
The description area displays the following information about the selected configuration:
The Load Identifier text box contains a text string that describes the selected configuration.
The OSLoader text box contains the filesystem path to the boot files (arcldr.exe and hal.dll) used by the current configuration.
The OSLoad Filename text box indicates the name of the directory containing the operating system. (The loader appends \System32\ to this path.)
The OSLoad Partition scrolling list box lists all of the partitions detected by the system firmware. Select the partition that contains the operating system kernel (by default, partition 1).
The System Partition scrolling list box lists all of the partitions detected by the system firmware. Select the partition that contains the boot files arcldr.exe and hal.dll (by default, partition 2).
The OSLoad Options text box contains the flags (if any) to be passed to the operating system. The default is no flags.
The table below indicates the values appropriate for systems that boot from an IDE drive and systems that boot from a SCSI drive.
Field | IDE Boot Drive | SCSI Boot Drive |
|---|---|---|
OSLoader | \os\winnt40\ | |
OSLoad Filename | \WINNT | \WINNT |
OSLoad Partition | IDE 0 Disk 0 | SCSI 2 Disk 0 Partition 1 |
System Partition | IDE 0 Disk 0 | SCSI 2 Disk 0 Partition 2 |
OSLoad Options | For normal operation, this should be blank. |
|
The Default button moves the selected configuration to the top of the list. The first configuration in the list is used to start up the visual workstation.
The New button creates a blank form in which you must name the new configuration and supply all values.
The Copy button makes a duplicate copy of the selected configuration. You must rename the new configuration and modify some or all of the values.
The Delete button deletes the selected configuration.
The Save & Exit button saves any changes you have made and returns you to the main screen.
The Cancel button discards any changes you have made and returns you to the main screen.
Use the System Settings screen to set system firmware options.
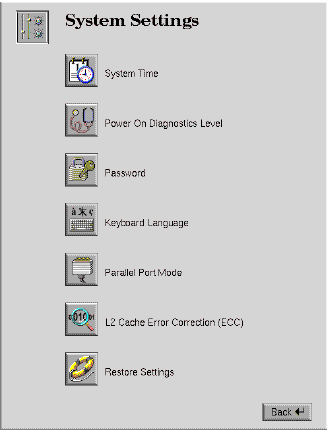
The screen contains seven buttons:
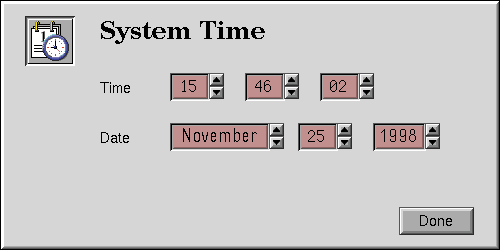
Clicking the System Time button displays a screen in which you can set the system clock. This is equivalent to setting the clock in the Windows NT Date/Time Properties control panel.
You should need to set the system clock only under very unusual circumstances.
Clicking the Power On Diagnostics Level button displays a screen in which you may specify the level of Power On Self Test (POST) diagnostics performed at boot time. The two options are Extensive Tests and Quick Boot (the default).
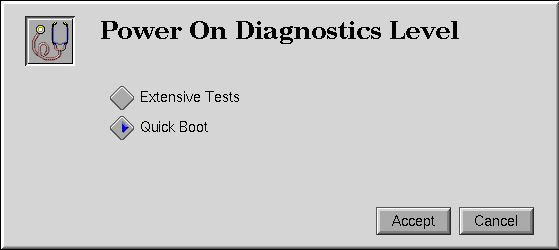
In Extensive Test mode, the boot sequence tests RAM memory in addition to the other tests performed in Quick Boot mode. This adds approximately one tenth of a second for each megabyte of RAM in the system to the amount of time required for system startup.
The system may automatically switch from Quick Boot mode to Extensive Test mode if the boot sequence fails to complete normally. If this happens, you must set the system back to Quick Boot mode manually.
Clicking the Password button displays a screen in which you can establish password protection for the system firmware. The possible options are as follows:
No Password specifies that no password is required for any changes to firmware settings or boot configurations.
Password for PROM Setup specifies that you must enter a password before you can modify firmware settings.
Password for PROM Setup and Boot specifies that you must enter a password before you can modify firmware settings or start the system.
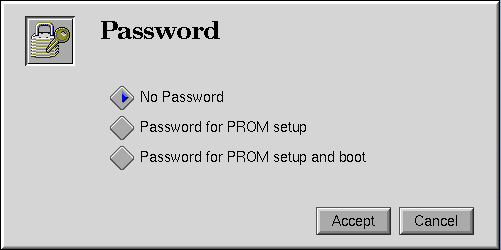
| Note: If a password is specified, it can be overridden via the password jumper. See your Owner's Guide for information. |
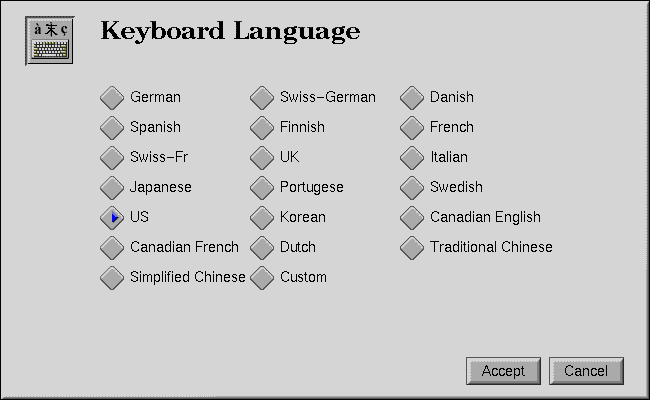
| Note: This setting is used only by the system firmware, not by Windows NT. From Windows NT, you can change the keyboard language layout using the Keyboard Properties control panel (choose Start > Settings > Control Panel > Keyboard). |
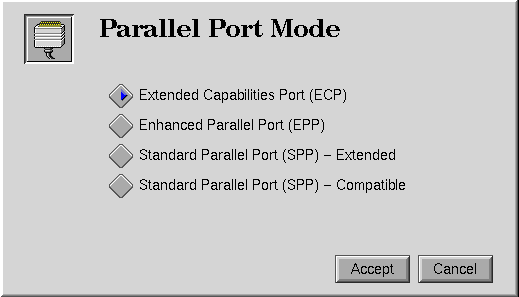
Clicking the Parallel Port Mode button displays a screen in which you can select the mode used by the workstation's parallel port. The possible modes are Extended (the default), Enhanced, Standard-Extended, and Standard-Compatible. Change the mode only if you attach a device to the parallel port that specifically requires a mode other than Extended.
Clicking the L2 Cache Error Correction button displays a screen in which you can turn error correction for L2 cache memory on or off (the default). Operating the visual workstation with L2 cache error correction turned off improves performance slightly. Operating with L2 cache error correction turned on may improve stability.
