This chapter provides a step-by-step description of installing the VCP-Recorder software in the following sections:
VCP-Recorder works with the following servers and workstation:
VCP-Recorder can interact with a variety of external devices, as shown in Figure 1-1.
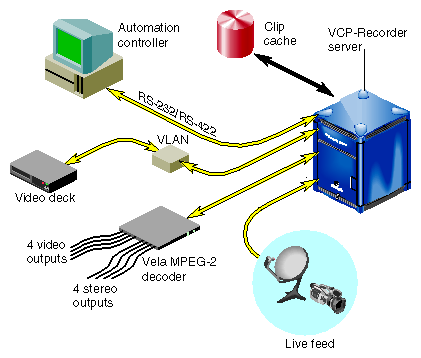
Part of the installation of VCP-Recorder includes configuring it to work with these input devices.
VCP-Recorder works with the following external devices:
Videotape recorders; V-LAN Transmitter; see Chapter 4, “Installing V-LAN Transmitters.”
Louth Automation Controller; see Chapter 2, “Installing the Louth Automation Controller.”
Vela Research MPEG-2 Decoder; see Chapter 3, “Installing the Vela Research MPEG-2 Decoder.”
Before you install VCP-Recorder, read through the following pre-installation topics to make sure you have the materials required for the installation and that your workstation meets all the VCP-Recorder requirements:
The release notes contain the latest information for the software required to use VCP-Recorder, such as required patches.
To read the release notes from the CD, use the following command:
# /CDROM/doc6.x/CDgrelnotes |
dic6.X is either doc6.3 or doc6.4, depending on the operating system your machine is running.
Before installing VCP-Recorder, install the patches required for VCP-Recorder, as specified in the Release Notes.
Use Software Manager or the inst program to install any required patches.
Before installing VCP-Recorder, install any hardware related to VCP-Recorder, such as VLAN, Vela, or DIVO boards. When you install VCP-Recorder, it automatically looks for drivers for optional hardware and changes its own default installation to include the subsystems relevant to the optional hardware.
The video hardware is an optional upgrade to your machine, but required for using VCP-Recorder.
An O2 needs one of the following video boards: Video I/O (also known as AV1, or O2Video) or Digital Video I/O (also known as AV2, or O2Video-601).
To determine whether your O2 has a video board, see if your machine has six RCA sockets: two red, two while, and two yellow. If you cannot find these sockets on your machine, you most likely do not have a video board.
An Origin2000, or Onyx2 needs a DIVO (Digital Video Option) board.
 | Note: VCP-Recorder is not supported using DIVO on an Origin200. |
For MPEG-2 decoding, you need a Vela 4-port, SCSI-attached, MPEG-2 decoder.
To install VCP-Recorder over a network, you must be successfully connected to a network. The default installation of an O2, for example, does not include networking software. To connect to a network, you must purchase NFS separately and install it.
Once NFS is installed, you create the file, /var/yp/ypdomain and only include in it the domain name of your machine.
For more information about connecting to a network, consult your system administrator.
Once your machine is properly configured, use the following procedure for installing VCP-Recorder over a network or from a CD.
Become a super user by entering the following command:
% su
Start the installation program and identify the source of the VCP-Recorder image, as follows:
# inst -f <machineName>:<distribution-directory>
Or, if you are installing from a CD, use
# cd /CDROM
# inst -f dist
This installation works for all operating systems.
If you are installing over the network, use a line similar to the following:
# inst -f bubka:dist/vcp-recorder/dist
List the subsystems to install as follows:
Inst> l
  View:      distribution
  Status:    N=new, U=upgrade, S=same, D=downgrade, P=patch upgrade
  Patches:   A=installable patch, X=uninstallable (missing base product)
  Selection: i=install, r=remove, k=keep

  Subsystem Types [bdrpc]:  b=reBoot needed, d=Default, r=Required, p=patch, c=Client only

  S  Das_lite_eoe.sw.lib [d]            0   MediaHub/MediaCache Interface Library

  N  fw_LWperl5.man.mansrc           1984+  Perl5 man page source
  S  fw_LWperl5.man.pages [d]           0   Perl5 formatted man pages
  S  fw_LWperl5.man.relnotes [d]        0   Perl5 release notes
  N  fw_LWperl5.src.perl             7204+  Base Perl Source
  S  fw_LWperl5.sw.perl [d]             0   Perl5 interpreter and std library

  S  fw_common.man.legal [d]            0   Freeware Legal Notice
  S  fw_common.sw.fixpath [d]           0   Freeware Common Tools
  S  fw_common.sw.index [d]             0   Freeware Release Note Index Builder

  PA patchSG0002275.desktop_base_sw.FileTypingRules [p]  0   Desktop Filetype Rules
  NX patchSG0002275.dmedia_dev_man.pages [p]  20+  Digital Media Development Man Pages
  NX patchSG0002275.dmedia_dev_sw.base [p]  180+  Digital Media Development Environment
  NX patchSG0002275.dmedia_dev_sw.debug [p]  4556+  Digital Media Debug Libraries
  NX patchSG0002275.dmedia_dev_sw32.debug [p]  4020+  Digital Media Debug n32 Libraries
  PA patchSG0002275.dmedia_eoe_man.pages [p]  0   Digital Media Manual Pages
  PA patchSG0002275.dmedia_eoe_sw.base [bp]  0   Digital Media System Components
  PA patchSG0002275.dmedia_eoe_sw.lib [p]  4+  Digital Media Execution Libraries
  PA patchSG0002275.dmedia_eoe_sw.plugins [p]  0   Digital Media Plug-ins
  PA patchSG0002275.dmedia_eoe_sw.tools [p]  0   Digital Media Tools
  PA patchSG0002275.dmedia_eoe_sw32.lib [p]  0   Digital Media n32 Execution Libraries
  PA patchSG0002275.dmedia_eoe_sw32.plugins [p]  0   Digital Media n32 Plug-ins
  PA patchSG0002275.media_warehouse_sw.viewers [p]  0   MediaWarehouse Viewer Framework

  NX patchSG0002485.dmedia_dev_man.pages [p]  0   Digital Media Development Man Pages
  NX patchSG0002485.dmedia_dev_sw.base [p]  60+  Digital Media Development Environment
  NX patchSG0002485.dmedia_dev_sw.debug [p]  536+  Digital Media Debug Libraries
  NX patchSG0002485.dmedia_dev_sw32.debug [p]  236+  Digital Media Debug n32 Libraries
  SA patchSG0002485.dmedia_eoe_man.pages [p]  0   Digital Media Manual Pages
  SA patchSG0002485.dmedia_eoe_sw.base [p]  0   Digital Media System Components
  SA patchSG0002485.dmedia_eoe_sw.lib [p]  0   Digital Media Execution Libraries
  SA patchSG0002485.dmedia_eoe_sw32.lib [p]  0   Digital Media n32 Execution Libraries

  NX patchSG0002486.dmedia_dev_man.pages [p]  400+  Digital Media Development Man Pages
  NX patchSG0002486.dmedia_dev_src.examples [p]  1580+  Digital Media Example Source Code
  NX patchSG0002486.dmedia_dev_sw.base [p]  24+  Digital Media Development Environment
  SA patchSG0002486.dmedia_eoe_books.MediaTls_UG [p]  0   Media Tools User's Guide, Help and Book
  NX patchSG0002486.dmedia_eoe_data.synth [p]  772+  MIDI Synthesizer Data Files
  SA patchSG0002486.dmedia_eoe_man.pages [p]  0   Digital Media Manual Pages
  SA patchSG0002486.dmedia_eoe_man.relnotes [p]  0   Digital Media Release Notes
  SA patchSG0002486.dmedia_eoe_sw.audio [bp]  0   Audio System Components
  SA patchSG0002486.dmedia_eoe_sw.base [p]  0   Digital Media System Components
  SA patchSG0002486.dmedia_eoe_sw.lib [p]  0   Digital Media Execution Libraries
  NX patchSG0002486.dmedia_eoe_sw.synth [p]  1236+  MIDI Synthesizer
  SA patchSG0002486.dmedia_eoe_sw.tools [p]  0   Digital Media Tools
  SA patchSG0002486.dmedia_eoe_sw32.lib [p]  0   Digital Media n32 Execution Libraries
  SA patchSG0002486.eoe_sw.unix [p]     0   IRIX Execution Environment

  PA patchSG0002796.eoe_sw.unix [bp]    0   IRIX Execution Environment

  S  vcp_recorder_eoe.books.AdminGuideHTML  0   VCP-Recorder 1.0 HTML Administrators Guide
  S  vcp_recorder_eoe.books.UsersGuideHTML  0   VCP-Recorder 1.0 HTML Users Guide
  S  vcp_recorder_eoe.books.VCPRecorderAG  0   VCP-Recorder 1.0 Administrators Guide
  S  vcp_recorder_eoe.books.VCPRecorderUG  0   VCP-Recorder 1.0 Users Guide
  S  vcp_recorder_eoe.man.base [d]      0   VCP-Recorder 1.0 Base man pages
  S  vcp_recorder_eoe.man.relnotes [d]  0   VCP-Recorder 1.0 Release notes
  S  vcp_recorder_eoe.man.tools [d]     0   VCP-Recorder 1.0 UI applications man pages
  S  vcp_recorder_eoe.sw.base [d]       0   VCP-Recorder 1.0 base software
  N  vcp_recorder_eoe.sw.louth        188+  VCP-Recorder 1.0 Louth processor
  S  vcp_recorder_eoe.sw.mediahub       0   VCP-Recorder 1.0 MediaHub interface
  N  vcp_recorder_eoe.sw.mpeg         200+  VCP-Recorder 1.0 MPEG tools
  S  vcp_recorder_eoe.sw.tools [d]      0   VCP-Recorder 1.0 UI applications
  N  vcp_recorder_eoe.sw.vela         168+  VCP-Recorder 1.0 Vela SCSI MPEG-decoder interface
  S  vcp_recorder_eoe.sw.vl             0   VCP-Recorder 1.0 SGI DIVO/O2Video interface
  N  vcp_recorder_eoe.sw.vlan         120+  VCP-Recorder 1.0 VLAN deck-control interface

Disk space summary (Kbytes):            / /usr/vtr/clips

Current free space                 963716         185156
- Selections net change                 0              0
- Temporary inst overhead               0              0
= Minimum free during install      963716         185156

Final projected free space         963716         185156
Note: If you installed the drivers for hardware, such as a VELA or VLAN board, the subsystem for those pieces of hardware would be marked for installation by default. This listing is for IRIX 6.3. The listing is slightly different for IRIX 6.4. Your operating system is read automatically and the correct subsystems are listed for your machine.
Table 1-1 describes each of the subsystems.
Table 1-1. VCP-Recorder Subsystems
If Using
Required Subsystems
Description
VCP-Recorder
vcp_recorder_eoe.sw.base
VCP-Recorder Base software.
O2/O2Video or Origin/DIVO
vcp_recorder_eoe.sw.vl
VCP-Recorder SGI DIVO/O2Video interface.
MPEG decoding using Vela decoder (O2 or Origin)
vcp_recorder_eoe.sw.mpeg
VCP-Recorder MPEG tools.
vcp_recorder_eoe.sw.vela
VCP-Recorder Vela SCSI MPEG-decoder interface.
VLAN transmitter
vcp_recorder_eoe.sw.vlan
VCP-Recorder VLAN deck-control interface
Automation controller using Louth protocol
vcp_recorder_eoe.sw.louth
VCP-Recorder Louth processor
MediaHub archive system
vcp_recorder_eoe.sw.mediahub
VCP-Recorder MediaHub interface.
Operator tools
vcp_recorder_eoe.sw.tools
VCP-Recorder UI applications.
Documentation
vcp_recorder_eoe.man.tools
VCP-Recorder UI applications man pages.
vcp_recorder_eoe.man.base
VCP-Recorder Base man pages.
vcp_recorder_eoe.man.relnotes
VCP-Recorder Release notes
vcp_recorder_eoe.books.*
Two books, each in html and Insight:
* VCP-Recorder Installation and System Administration Guide. * VCP-Recorder User's Guide.
Note: The documentation in vcp_recorder_eoe.books.* is not installed by default. Mark for installation any optional VCP-Recorder-related software you might need. For example, if you are using VELA, MPEG, louth, or VLAN, install one or more of the following options, respectively:
Inst> i vcp_recorder_eoe.sw.vela
Inst> i vcp_recorder_eoe.sw.mpeg
Inst> i vcp_recorder_eoe.sw.louth
Inst> i vcp_recorder_eoe.sw.vl
For more information about VELA, see Chapter 3, “Installing the Vela Research MPEG-2 Decoder.”
For more information about louth, see Chapter 2, “Installing the Louth Automation Controller.”

Tip: If you intend to install MediaHub (vcp_recorder_eoe.sw.mediahub) for clip archiving, you need to install Das_lite_eoe.sw from the MediaHub CD first. Initiate the installation, as follows:
Inst> go
Quit the installation program, as follows:
Inst> quit
VCP-Recorder automatically detects the operating system of your machine and lists the subsystems for that operating system automatically. If you would like to install the 6.4 version of VCP-Recorder on a machine running IRIX 6.3, use the following installation command in step 2 above:
# inst -f dist6.4 |
You can also install the 6.3 version of VCP-Recorder on a machine running IRIX 6.4, use the following installation command in step 2 above:
# inst -f dist6.3 |
Use the following procedure to configure VCP-Recorder:
Move to the configuration file directory, as follows:
# cd /usr/vtr/config
If you are connecting to MediaHub for archiving clips, using a text editor, append the following line to the configuration file, mediahub.conf, if Mediahub is running on a remote machine:
MediahubServerMachineName ats
MediahubServerMachineName is the host name of the server running Mediahub. You can add more than one server name. The MediaHub Asset Transfer Services (ATS) should always be specified as the second argument. This argument starts ATS on the server.
If Mediahub is running on your local machine, append “share” to the line, for example:
myMachine ats share
To configure VLAN or Louth, see Chapter 4, “Installing V-LAN Transmitters” and Chapter 2, “Installing the Louth Automation Controller,” respectively.Configuring Automatic Startup at Boot Time
By default, when VCP-Recorder is installed, it does not enable itself to be automatically started when the system boots. VCP-Recorder can be configured to automatically start itself at boot time using chkconfig. VCP-Recorder is controlled by the setting of the vtr option:
% chkconfig vtr on # enables automatic startup % chkconfig vtr off # disables automatic startup |
All clips played and recorded by VCP-Recorder are stored on one or more XFS-based file systems referred to as the “clip cache.” These file systems are mounted at or under the directory /usr/vtr/clips.
How the file system which will host the clip cache is created depends upon the type of disk subsystem that will be used. Available choices for clip storage include a native XFS file system on an attached disk drive, an XLV striped disk volume (using UltraSCSI disk drives on internal and/or external UltraSCSI buses), or some type of RAID subsystem connected via either FibreChannel or SCSI. If an XLV striped disk volume is to be used, xlv_make(1M) is used to create the logical volume. The volume's stripe unit (the number of disk blocks per disk per stripe) is chosen to maximize performance.
A stripe unit value of 552 disk blocks is optimal for 525-line uncompressed (Rec. 601) video use. This results in a stripe size of 2260992 bytes for an 8-disk volume, or 1081344 bytes for a 4-disk volume. This stripe size holds, respectively, exactly 6 or 3 uncompressed 4:2:2 8-bit fields (2 bytes/pixel) when the field is rounded up to the nearest 16KB to match the recommended file system block size.
A stripe unit value of 624 disk blocks is optimal for 625-line uncompressed (Rec. 601) video use. This results in a stripe size of 2654208, bytes for an 8-disk volume, or 1327104 bytes for a 4-disk volume. This stripe size holds, respectively, exactly 6 or 3 uncompressed 4:2:2 8-bit fields (2 bytes/pixel) when the field is rounded up to the nearest 16KB to match the recommended file system block size.
For compressed video, a stripe unit of 512 disk blocks should work well.
Once the XLV volume is created, or if you are using an external RAID device, you must create the XFS file system using mkfs_xfs. A file system block size of 16KB is suggested:
% mkfs_xfs -b size=16384 <disk volume device> |
| Note: If you wish to use a real-time subvolume for the clip cache, install the latest recommended XFS rollup patch for your OS version. |
In addition, you must set the real-time extent size equal to the stripe size of your disk subvolume.
Default control settings for your video devices may be set by creating or editing the appropriate configuration file in /usr/vtr/config/device-defaults. To make control settings that are used by all DIVO video ports, you may set the default values that are used when each unit is created by editing /usr/vtr/config/device-defaults/DIVO.
Default control values may be set for individual DIVO board by creating the appropriate device-defaults file using the name of the DIVO port. For example, device-default control values that apply only to the first DIVO port are placed in: /usr/vtr/config/device-defaults/DIVO_0.
Refer to the vcp-recorder-controls(5) man page for detailed information about the configuration controls available.
| Note: This section does not apply to audio handling when a Vela MPEG decoder is being used. The audio configuration is managed by the decoder. |
The default input audio port is “DefaultIn,” meaning the audio is taken from the default input as set in the server's Audio Panel. Similarly, the default output audio port is “DefaultOut”.
To change the input or output audio port, set either vtr.media.audio.input.port or vtr.media.audio.output.port, respectively. Audio port names take the form subsystem.interface.jack
For audio ports based upon the Radical audio subsystem:
subsystem is “RADn.”
interfaces is one of “AnalogIn,” “AnalogOut,” “AESIn,” “AESOut,” “ADATIn,” or “ADATOut.”
jack is one of “LineIn,” “Microphone,” and only applies to “AnalogIn.”
For example, to take audio input for the DIVO_1 port from the AES coaxial input on a Graphics BaseIO, edit the file /usr/vtr/config/device-defaults/DIVO_1, and add this control setting:
vtr.media.audio.input. port “RAD1.AESIn” |
To use the SMPTE-272M embedded audio support on a DIVO port:
subsystem is “DIVO_n”
interface is “DigitalIn” or “DigitalOut”
You may also specify just “VideoIn” or “VideoOut” (no subsystem name). These interface names are a special tokens that VCP-Recorder translates to the appropriate DIVO digital audio port, for example:
vtr.media.audio.output.port “VideoOut” |
The vtr.media.video.output.sync_source control may be set to one of internal, external, digital-input-link-a, or digital-input-link-b.
This control may be set for all DIVO boards in the server in the device-defaults/DIVO file, or may be set per board in the device-defaults/DIVO_n files.
By default, VCP-Recorder uses Rice packing when recording clips using a DIVO and JPEG compression when recording clips on an O2.
To capture uncompressed video fields, set the vtr.media.video.input.compression.type control to none.
To enable VCP-Recorder to use one or more MediaHub hosts as archive systems, edit /usr/vtr/config/mediahub.conf, and include one line for each MediaHub host.
The format of each configuration line is:
<hostname> <service-name> |
Usually, the service-name is “ats”.
If the MediaHub host is the same as the VCP-Recorder host, the media files can be shared by appending “shared-content” to the end of the configuration line, as follows:
machineName ats shared-conten |
where machineName is the VCP-Recorder and MediaHub host. Sharing the assets prevents duplication of the media assets on your server.
To confirm the successful installation of VCP-Recorder, complete the following steps:
Start VCP-Recorder by entering the following command as a super user:
# /usr/vtr/bin/vtrstart
If VCP-Recorder starts, on an O2 only, the VCP-Recorder window displays.
To see if VCP-Recorder started, run
# /usr/vtr/bin/vtrstat
If VCP-Recorder is running, the command responds:
VCP-Recorder on hostname is running.Verify the media ports supported by running the following command:
/usr/vtr/bin/vtrstat -ports
vtrstat lists the supported ports, for example:
#  Port    Type    Description
----------------------------------------------------------
0  vlan_0  Deck    VLAN Deck Control
1  DIVO_0  Video   SGI XT-DIVO Digital Video Option
2  DIVO_1  Video   SGI XT-DIVO Digital Video Option
3  DIVO_3  Video   SGI XT-DIVO Digital Video Option
4  DIVO_4  Video   SGI XT-DIVO Digital Video Option
5  DIVO_5  Video   SGI XT-DIVO Digital Video Option
6  DIVO_6  Video   SGI XT-DIVO Digital Video Option
7  DIVO_7  Video   SGI XT-DIVO Digital Video Option
You can also confirm the installation by inspecting the contents of the /usr/vtr and /var/adm/vtr/logs directories:
dutch 2# cd /usr/vtr
dutch 3# ls
bin      clips    config   data     images   index    install  lib32    lib
dutch 4# cd /var/adm/vtr
crash   logs
dutch 5# cd /var/adm/vtr/logs
dutch 6# ls
vtrlog
The crash directory contains crash files for vvtr and vtrd.
Table 1-2 describes these directories.:
Table 1-2. /usr/vtr Subdirectories
Subdirectory
Description
bin/*
Commands and VCP-Recorder executable, vvtr.
config/*
Configuration files.
index/*
Clip indices (MPEG and vframe formats).
lib32/*.so
Core and shared libraries.
lib32/modules/*.so
External interface device/control/format modules.
clips/*
Clip cache (can be symlink).
images/*
The directory under which still images are created when the MVCP CIMG command is executed.
data/*
Files under this directory are static data or image files used by various VCP-Recorder components.
install/
Files that are used during the installation.