Before removing the OCTANE/SI secondary head graphics board, you must power off the OCTANE workstation, wait 5 minutes for the heat sinks to cool, attach a wrist strap, and remove the XIO module. If you have not already done so, see “Preparing the Workstation to Install the OCTANE/SI Board” and follow the instructions through removing the XIO module. Be sure to also read “About the XIO Module and XIO Boards” before beginning your task. Then return here for instructions on removing the secondary graphics board.
 | Caution: Do not touch the gold (front) surface of the XIO compression connector. Touching it could damage the connector. Place a protective cap on the XIO compression connector to prevent damage when the XIO boards are removed from the OCTANE workstation. See Appendix B, “Care and Cleaning of the Compression Connectors.” |
 | Note: If you need to replace the primary head graphics board, have the replacement graphics board beside you before you begin removing the primary head graphics board. |
The processes for removing a graphics board and blank panel are the same.
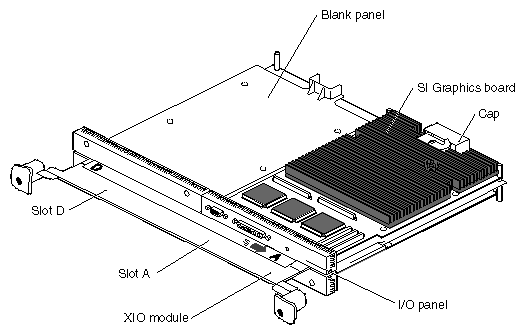
 | Warning: The heat sinks on the XIO boards become very hot. Wait 5 minutes after powering off the OCTANE workstation before you remove the XIO module. Test before touching any of the XIO boards. |
The graphics board in slot A (OCTANE/SI) or slots A and D (OCTANE/SSI or MXI) is the primary head in a dual head system. For graphics board identification, see Appendix C. The primary head graphics board also carries the texture memory option boards in a dual head system. (The only exception is OCTANE/SI with texture memory option board as the primary head, and OCTANE/SI with texture memory option board as the secondary head.)
The secondary graphics board is in slot B or possibly C.
| Note: For illustration purposes, because slot B is the preferred location of the second head, the secondary graphics head is shown in slot B. |
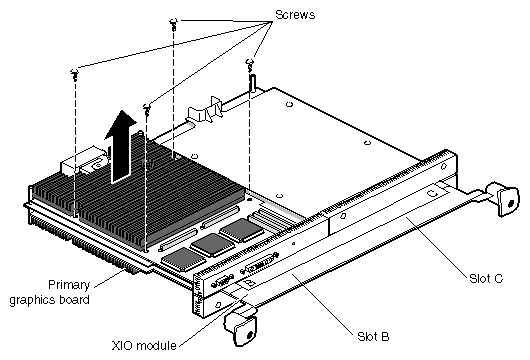
Turn the XIO module so that the secondary graphics board faces you.
Using a Phillips screwdriver, remove the four screws from the OCTANE/SI graphics board.
Grasp the graphics board by its I/O panel and on the opposite side of the board, and lift.
With the same side facing up, place the board on a clean, antistatic surface.
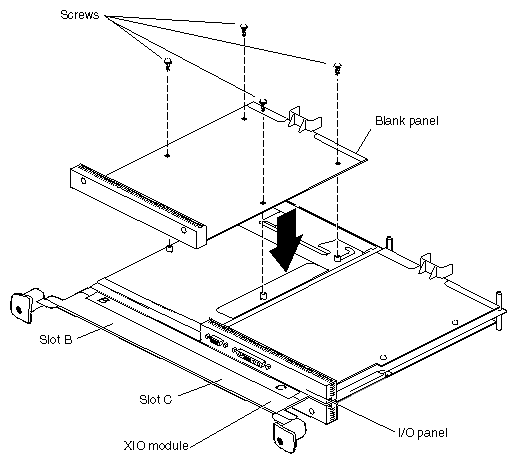
Place a new secondary graphics board, blank panel, or other XIO board in the slot from which you just removed the secondary graphics board.
Place the new graphics board, blank panel, or option XIO board on the standoffs.
Use the four screws you just removed from the graphics board to secure the blank panel, graphics board, or option board to the XIO module. (Do not install the baffle unless you have two side-by-side blank panels.)
If you installed:
Go to:
An option board in the empty slot.
The installation guide for the option board and follow the instructions in that manual to complete the installation.
A graphics board in the empty slot.
Step 3.
A blank panel in the empty slot that is next to a graphics or option board.
Step 3.
A blank panel in the empty slot next to another blank panel.
The next step.
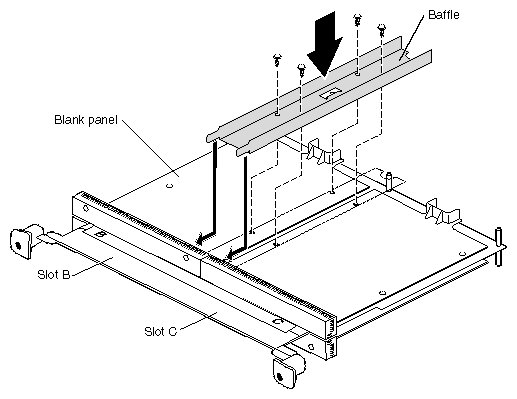
If your board configuration results in two side-by-side blank panels, install a baffle across them.
Place the blank panel on the standoffs.
Replace only the two screws near the edge of the XIO module.
Remove the two inner screws from the blank panel already in place.
Place the baffle over the inner edges of the two blank panels.
Insert four screws through the baffle and blank panels into the standoffs beneath.
Remove the caps from any compression connectors.
Go to “Replacing the XIO Module” to install the XIO module and power on the OCTANE workstation.