This chapter describes how to run SoftWindows, and how to use it to run Windows and MS-DOS applications on your UNIX workstation.
SoftWindows initially runs in a separate X Windows window, and you can run PC applications at the same time as your UNIX applications.
For full installations, SoftWindows is set up to launch Windows 95 automatically as soon as you run it.
If you want to use MS-DOS you can either run MS-DOS in a window, or exit from Windows 95 to the SoftWindows MS-DOS window.
To run SoftWindows, type the following command in a UNIX terminal window:
SoftWindows95 |
The Windows 95 welcome screen will then be displayed.
The first time you run SoftWindows a hard disk file is created and saved in your home directory under the name WIN95-username.hdf, where username is your UNIX login ID. This may take several minutes. If this file already exists, SoftWindows uses it as your bootable C: drive.
Choose Continue to create the hard disk file, or Exit to exit from SoftWindows.
If the option to install the hard disk data file was not selected during a full installation, a dialog box appears.
Enter the path to the data file WIN95.DAT (provided on the second installation CD-ROM CD2) in the Data File... field.
For example, if CD2 is mounted in the /CDROM directory, enter /CDROM/WIN95.DAT.
If there is insufficient space to create the hard disk file in your home directory, a dialog box offers you the option to specify an alternative location.
Choose OK if you want to specify an alternative location for the hard disk file, or Exit to exit from SoftWindows.
If you choose OK, a dialog box appears.
Choose the location in which to create the file, enter a name for the file in the Selection field, then click OK.
Softwindows creates the hard disk file in the location you specify, and a symbolic link in your home directory called WIN95-username.hdf that points to the hard disk file.
Certain batch files then run to load the latest device drivers.
A dialog box will be displayed to allow you to choose the size of the Windows desktop.
Select the size you want, then choose OK to run Windows.
Note that increasing the size of the window will require more memory and may reduce performance.
The Enter Windows Password dialog box appears and prompts you to supply a user name and optional password.
The Windows 95 desktop will then be displayed as shown on the previous page. For more information about Windows 95 refer to Chapter 3, “Using Windows 95.”
Restarting SoftWindows has the following effect:
In Windows 95, the Shut Down Windows dialog box is displayed, allowing you to shut down Windows, restart, or cancel the operation.
In Windows 3.11, Windows restarts immediately without offering the option to cancel the operation.
If you are switching between SoftWindows and UNIX applications, you can either manually freeze SoftWindows or set SoftWindows to automatically freeze when it loses window focus. This lets you optimize your use of the available CPU resources on your system.
To freeze SoftWindows, choose Freeze from the Actions menu.
When you choose Freeze, SoftWindows stops running without affecting the SoftWindows window, and a button is displayed against the menu function. Select Freeze again to restart SoftWindows.
Note that you should not use Freeze if you are using network resources or are connected to a LAN server, as any network connections could time out.
If you want SoftWindows to freeze automatically whenever its window does not have focus, choose Auto Freeze from the Options menu. SoftWindows will unfreeze as soon as focus is returned to its window.
Choose Exit from the File menu.
A dialog box appears.
Choose Create TurboStart data file to use TurboStart.
This saves your work so that Windows 95 loads instantly the next time you run SoftWindows, and you can resume where you left off. By default SoftWindows saves the the TurboStart data in .swinturbo in your home directory. You can configure SoftWindows to use a different file. See “To specify the TurboStart data file.”
Alternatively you can choose Shutdown from the Windows 95 Start menu to quit without TurboStart. When you next run SoftWindows, Windows 95 will be restarted in the usual way.
You can also choose Exit from the File menu and deselect the Create TurboStart data file option.
Save Configuration Changes is selected by default if you have made any configuration changes. This saves any changes you have made to the configuration of SoftWindows in your .swinconfig file.
If you do not want to save any changes, deselect the Save Configuration Changes option before selecting OK. For more information refer to “Configuring SoftWindows” SoftWindows 95 for UNIX Administrator's Guide
Choose Turbo from the File menu.
A dialog box appears.
Type the name of the TurboStart data file you want to create into the text box. Alternatively, click TurboStart File...
A dialog box lets you select the directory in which you want to save the Turbostart data file.
Select a directory into which you want to save the file, append the name of the TurboStart data file you want to create into the Selection field, then click OK.
The next time you start SoftWindows, Windows 95 is loaded instantly in the same state as when you exited from SoftWindows, and the Turbostart data file is then deleted.
SoftWindows can use most UNIX workstation keyboards to produce all the keys and key combinations you need to run MS-DOS applications. SoftWindows provides support for French, German, UK and US UNIX workstation keyboards.
The tables on the following pages list the keyboard keys, or key combinations, needed to produce all the PC/AT keys that are found on a US version 101-key IBM keyboard that do not directly correspond to particular UNIX workstation keys.

SoftWindows supports the use of 3.5-inch MS–DOS format floppy disks using the floppy disk drives on your UNIX workstation.
Before using floppy disk drive A: or B: you need to assign it to the internal 3.5-inch floppy disk drive on your computer, using the Open Drive… function on the Disk Drives cascade menu on the Options menu; refer to “Setting up floppy disk drives” in the SoftWindows 95 UNIXfor UNIX Administrator's Guide.
| Note: SoftWindows does not support D.M.F. 1.6 Mbyte disks. |
Type the following command at the MS-DOS C:\> prompt:
DIR A:
You can work with MS-DOS format CD-ROMs using a CD-ROM drive attached to the UNIX workstation.
Before you can use CD-ROMs you need to set up the CD-ROM drive; refer to “Setting up the CD-ROM” in the SoftWindows 95 for UNIX Administrator's Guide.
Double-click the [F:] CD-ROM icon in the My Computer folder.
Type the following command at the MS-DOS C:\> prompt:
DIR F: |
When running Windows 95 in MS-DOS mode:
This sets up the CD-ROM drive as drive F:, and you can now use it like any other drive.
The CD-ROM drive is configured automatically for use from a windowed or full screen MS-DOS Prompt in Windows 95.
SoftWindows includes software called the Virtual File Sharing Architecture (VFSA) that allows PC files to be stored in the UNIX file system and still be accessed by Windows and MS–DOS applications as though they were on a PC disk.
When using a PC, the VFSA drive would be on another computer and the PC would be able to access it through a network driver. SoftWindows uses this attribute of Windows 95 to access a specified UNIX directory, which can either be on your workstation's hard disk or on an NFS-mounted file system from a remote server.
The PC files in a VFSA drive reside as individual UNIX files and can be used by UNIX programs that can work with PC files.
Windows 95 filenames are not case sensitive, so upper and lower case letters are treated as equivalent. When you set up a VFSA drive you specify the character case you prefer to work with. Whenever you create a new file SoftWindows maps all files to a unique filename except for filenames that are in the preferred case for the VFSA drive.
When assigning UNIX drives to a VFSA drive your preferred case must be either lower or upper. The table below sumarizes the way file names are mapped from UNIX to Windows 95 for each preferred case.
When assigning case-insensitive drives (such as PC drives) to a VFSA drive you may prefer to set the preferred case to Case Insensitive, which causes all file names to be preserved regardless of case.
To enable Windows 95 to distinguish between files whose UNIX names differ only in case (for example, fred.txt and FRED.TXT), you select a preferred case for each VFSA drive you set up. SoftWindows preserves file names that are in the preferred case, but maps all other files to a unique filename.
Table 2-1. Summary of Preferred Case Filename Mapping Between UNIX and Windows 95
Preferred Case | UNIX filename | Windows 95 | MS-DOS Prompt | MS-DOS |
|---|---|---|---|---|
Lower | readme | readme | README | README |
| README | README~abc | READ^ABC | README |
Upper | readme | readme~abc | READ^ABC | README |
| README | README | README | README |
where ~abc is a code based on the check-sum value of the file.
| Note: Some Windows 95 applications such as Windows Explorer display upper case filenames in first caps. For example, you may see the file README displayed as Readme. |
Windows files cannot contain the following characters:
\ / : * ? < > |
If a UNIX filename contains one or more of the above characters, each invalid character is mapped to {nn}, where nn is a two-digit code. For example, a UNIX file named a:b will be mapped to a{3a}b in Windows 95 (assuming the preferred case is set to Lower Case).
In SoftWindows, copy the file to a drive which has been set up as a VFSA drive.
For example, if you have set up your home directory as drive E:, save the file to the E: drive.
You will then see the file in your home directory.
Put the file in a directory you have set up as a VFSA drive.
For example, if you have set up your home directory as drive E:, you can make a file available on the PC drive E: by putting it in that directory.
Type the following command in an MS-DOS window:
C:\INSIGNIA\NET USE |
This will list the drive letter of each VFSA drive followed by the UNIX pathname of the directory to which it is attached.
Note that the not sharing message is normal, and refers to MS-DOS SHARE.
When SoftWindows is first installed, the following drives are set up for you:
Table 2-2. Drives Available When You First Install SoftWindows
Drive | UNIX directory |
|---|---|
E: | Your home directory |
G: | Directory required to run Microsoft Windows (Upgrade installation only) |
H: | Your home directory |
For more information about setting up VFSA drives, refer to “Setting up VFSA drives” in the SoftWindows 95 for UNIX Administrator's Guide.
SoftWindows is supplied with Winsock (1.1) drivers and Microsoft Internet Explorer pre-installed and ready to use. For more details, see Chapter 5, “Using SoftWindows with the Internet.”
SoftWindows includes networking software to enable you to access PC network file servers from SoftWindows running on a UNIX workstation.
By default SoftWindows is not set up to access Local Area Network services. This requires re-configuring Windows 95 to access the network device on the host workstation via NDIS or ODI drivers supplied with SoftWindows. See “Networking with SoftWindows” in the SoftWindows 95 for UNIX Administrator's Guide.
Once you have set up the network access you have the same access to a PC file server as a PC user, including the ability to run multi-user PC applications.
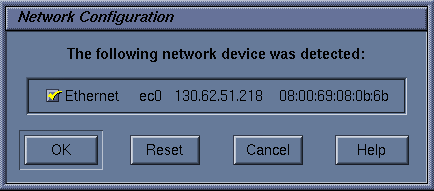
To use a network card other than the default selected by SoftWindows, do the following:
Choose Network from the Options menu to display the Network Configuration dialog, shown in Figure 2-2.
The dialog lists all available network cards on your UNIX machine, with the default card selected.
Click on the check box next to the network card you want SoftWindows to use to specify a different card.
If you have more than one Ethernet card installed, it is recommended that you only select one of each type.
Use the Sound function to use the UNIX workstation's sound facilities to emulate PC sounds. The initial default setting has sound disabled.
Choose Sound from the Options menu.
A dialog box appears.
Choose Enable Sound to enable sound on the host workstation.
After choosing this function you will need to restart SoftWindows, and a dialog box is displayed to allow you to proceed or cancel the function.
Choose Enable Sound again to disable it.
Note that PC applications that generate complex sounds, such as digitized voices or music, may run slowly even if the Sound function is disabled. In this case you should turn off sound in the PC application.
With Sound enabled, choose Mute Sound to temporarily switch off sound without affecting playback volume settings in individual Windows applications.
With Sound enabled, choose Ignore Windows Sound Volume if you want the playback volume to be controlled by the Audio Control Panel settings on the host workstation, instead of the playback volume settings in individual Windows applications.
To reverse the left and right stereo channels:
Choose Sound from the Options menu to open the Sound panel.
Click the box next to Reverse Stereo Channels. A checkmark indicates the channels are reversed.
Sound Blaster is typically used to enhance sound while playing video games. It is off by default. To turn Sound Blaster on:
Choose Sound from the Options menu to open the Sound panel.
Select one of the following Sound Blaster options:
Select Sound Blaster 16 for average quality sound.
Select Sound Blaster Pro for the highest quality sound. Sound Blaster Pro provides MPU-401 compatible MIDI support.
Select None to turn Sound Blaster off.
By default SoftWindows uses settings in the Audio Control Panel to determine the input and output devices. Environment variables enable you to specify alternative devices for SoftWindows; refer to “Setting up SoftWindows” in the SoftWindows 95 for UNIX Administrator's Guide.
To play and record MIDI sound files:
Choose Internal from the MIDI Device Type list to use an internal sound device such as a software synthesiser. In most cases you should choose the Software Synth option from the Value Assignment list.
Choose External from the MIDI Device Type field to use an external sound device connected to a serial port. In most cases you should choose the Serial Port 1 option from the Value Assignment list.
If you are an advanced user, you can use the CPU panel to enable/disable FPU emulation, to enable/disable MMX, and to enable/disable RDTSC.
Optimized Floating Point Emulation (FPU) is on by default. Optimized is potentially less accurate, but faster. Standard is very precise, but slower. Optimized is recommended for most applications, but if you experience problems, try switching to Standard. You can also disable FPU by doing the following:
Click the box next to Floating Point Emulation. The checkmark disappears. To re-enable it, click the box again.
After choosing this function you will need to restart SoftWindows, and a dialog box is displayed to allow you to proceed or cancel the function.
| Note: Due to the different precisions of the PC FPU and the emulated FPU, some programs may run differently than a PC when FPU emulation is enabled. For example, the rounding of decimal numbers may be incorrect. In such cases the FPU emulation should be disabled. |
MMX is on by default. Since it can marginally slow down system performance, you may want to turn it off if you aren't using it:
Choose CPU from the Options menu to open the CPU panel.
Click the button next to MMX to turn it off. The checkmark disappears. To turn it back on, click the button again.
After choosing this function you will need to restart SoftWindows, and a dialog box is displayed to allow you to proceed or cancel the function.
The Read Time Stamp Counter (RDTSC) is on by default. It is required by certain applications, such as NASCAR 2. If the application you're using doesn't need it, you can turn it off to marginally increase system speed:
Choose CPU from the Options menu to open the CPU panel.
Click the box next to RDTSC to turn it off. The checkmark disappears. Click it again to turn it back on.
After choosing this function you will need to restart SoftWindows, and a dialog box is displayed to allow you to proceed or cancel the function.
Use the Activate function to control which of the PC drives, A: to D:, or the PC ports, LPT1: to LPT3:, or COM1: to COM4:, are reserved for use by SoftWindows.
SoftWindows will always try to activate a drive or port when it is first selected, according to the settings in the Open Disk Drives, Comms Ports, and Printer Ports dialog boxes; refer to the SoftWindows 95 for UNIX Administrator's Guide, and “Printing, input, and output.”
Choose Activate from the Actions menu.
Devices in use by SoftWindows are shown with a highlighted button next to their name in the cascade menu.
Entries with no device assigned to them are shown grayed out in the menu.
Choose the corresponding drive or port from the Activate cascade menu.
Choose C Drive or D Drive from the Activate cascade menu.
When a button is shown beside the drive name, you have read and write access, and other users only have read access.
When there is no button beside the drive name, you only have read access, allowing another user to write to the drive.
Any number of users can have read access to a hard disk file, but only one can have write access at any time.
On a PC, applications communicate with external devices such as printers and modems via the COM1: to COM4: serial ports and the LPT1: to LPT3: parallel ports.
You can assign these ports to take advantage of the equivalent capabilities of the UNIX workstation.
The following table summarizes the options for the COM and LPT ports:
Table 2-3. Summary of Options for COM and LPT Ports
Option | Description |
|---|---|
File | Output redirected to a specified file[a] |
Pipe | Output directed to the print spooler for network printing† |
Device | Input/output to a device connected to the workstation's serial port |
None | No device assigned |
[a] Output must be flushed. | |
After outputting from a SoftWindows COM or LPT port to a file or pipe, you need to flush the output to ensure that the last partial buffer of data is sent to the file or pipe.
SoftWindows provides an Auto Flush option, which flushes the buffer automatically a specified interval after the last activity on the port.
Alternatively, you can flush output from a port manually when you know that output has finished.
Choose Auto Flush… from the Options menu.
A dialog box appears (Figure 2-3).
Set the required delay by moving the Autoflush Delay slider until the value you want is shown above the slider. You can set any autoflush delay from 1 to 300 seconds.

The ideal autoflush delay depends on how quickly the PC application outputs data, and you may need to experiment by starting with a high value, and then reduce it to find the best setting.
You can set flushing for an individual file or pipe by setting the Enable Windows PostScript flushing option in the Printer Ports or Comms Ports dialog box.
When data being sent to a pipe is flushed, the pipe process is stopped and another one is started. If you are piping data to the print spooler, this will stop the current job and start another one.
For pipes the autoflush delay must therefore be set to an interval greater than the time it takes to generate each buffer of data for a particular job; otherwise unwanted print jobs, and incorrect output, may be generated.
The port should be flushed after outputting to a COM or LPT port from SoftWindows with the Pipe option.
The buffers are also flushed automatically when you quit from SoftWindows.
You can redirect all output from a specified port to a file in the UNIX file system.
Redirecting output from SoftWindows to a file is a useful way of debugging problems with printing. The file can then be printed externally to SoftWindows.
Choose Printer Ports… or Comms Ports… from the COM/LPT Ports cascade menu on the Options menu, depending on whether you want to redirect an LPT or COM port.
Choose File from the popup menu next to the port you want to redirect.
The filename defaults to SoftWin.tmp in your home directory. Alternatively, enter the filename you want to use. If the file already exists, the output will be appended to it.
Check that Enable Automatic Flushing is set in the Auto Flush dialog box, so that output is flushed to the file; refer to “To flush output automatically.”
You can pipe the output from a port to a UNIX process that will accept text input. One use for this is to print a file which is not PostScript.
Choose Printer Ports… or Comms Ports… from the COM/LPT Ports cascade menu on the Options menu, depending on whether you want to pipe the output from an LPT or COM port.
Choose Pipe from the popup menu next to the port whose output you want to pipe, and enter the name of the process.
Do not include the leading pipe symbol, |, as this is assumed. By default, output is piped to lp, the UNIX print spooler.
Check that Enable Automatic Flushing is set in the Auto Flush dialog box, so that output is flushed to the pipe; refer to “To flush output automatically.”
A COM port can be attached to either of the serial ports for input and output, with selectable serial parameters, using the Device option.
This option is intended for use by communications packages that provide their own handshaking.
The following serial parameters are supported:
Baud rate: 50, 75, 110, 134.5, 150, 300, 600, 1200, 1800, 2400, 4800, and 9600.
The following combinations are supported:
Table 2-4. Support Com Port Combinations
Data bits | Parity | Stop bits |
|---|---|---|
8 | None | 1 |
7 | Even | 1 |
7 | None | 2 |
7 | Odd | 1 |
By default, COM1: is set up by the following MODE command in the AUTOEXEC.BAT file:
MODE COM1:9600,N,8,1
This gives the following communications settings:
9600 baud, no parity, 8 data bits, and 1 stop bit
This setting can be changed with the MODE command.
Connect the serial device to the workstation's serial port.
Choose Comms Ports… from the COM/LPT Ports cascade menu on the Options menu.
The Comms Ports dialog box appears.
Choose Device from the COM1: popup menu.
You should enter the appropriate device name for the port you want to use. If necessary, ask your system administrator.
SoftWindows uses facilities provided by the UNIX terminal device drivers to determine the state of the serial port. As a result, the PC/AT serial port cannot be fully emulated, although most devices and packages designed to operate with it will work equally well on SoftWindows.
The following technical details are provided for users who need specialized help in getting a device or package to work properly or who are developing software which uses the serial ports.
This line is always held high.
The effect is that devices can detect DTR (Data Terminal Ready), but a response from the device via DSR cannot be detected by SoftWindows. Therefore SoftWindows cannot support hardware handshaking, and XON/XOFF software handshaking should be used instead.
The occurrence of input overrun and framing errors in the hardware or an input break condition cannot be detected.
The following should be noted if you are choosing a package to run under SoftWindows on the UNIX workstation or you are developing software that uses the serial ports for communication.
You should normally use 4800 baud or lower. Higher speeds are likely to be less reliable.
The packet size should be kept small: 512 to 1024 bytes is a suitable size.
Interrupt driven is preferable to polled data transfer. When SoftWindows receives data from an external source with XON/XOFF data flow control, the program running on SoftWindows may have problems. This is due to host buffering of input data preventing the program from responding quickly enough to XOFF signals.