This chapter covers what you need to know about the tape drives on your workstation or server. The cartridge tape device is used primarily for filesystem backups and data transfer.
The following sections are contained in this chapter:
For information on backing up data onto tapes, see IRIX Admin: Backup, Security, and Accounting . If you are installing a tape drive, see the installation instructions furnished with the hardware.
Almost all workstations are configured with some sort of tape device for making backup copies of your files. Whether you maintain one system or a network of hundreds of workstations, you will eventually have to use and maintain some form of tape drive.
To install a tape drive on an IRIX system, follow the hardware installation instructions that is furnished with your tape drive. Make sure you carefully follow any instructions regarding drive terminators.
If you are adding a tape drive to a system that does not have one, the software configuration is taken care of automatically when the system boots. When the system boots, if hinv indicates that a tape drive is installed, but there is no link to it through the /dev/tape file, the MAKEDEV program is automatically invoked to add the proper device nodes.
If you are installing a tape drive after your initial system installation, perform the following steps:
Install the hardware.
Log in as the superuser and enter these commands:
cd /dev
./MAKEDEV tape
The MAKEDEV program creates the appropriate device nodes.
If you have removed a tape drive and are installing one of a different type, follow these steps:
Install the hardware.
Log in as the superuser and enter these commands:
cd /dev
rm *tape
./MAKEDEV tape tapelinks
The MAKEDEV program creates the appropriate device nodes and links the correct node for the drive to /dev/tape.
The MAKEDEV program supports these options for tape drives:
| tape | Creates all the tps and xmt tape devices, then makes links to tape, nrtape, tapens, and nrtapens for the first tape drive found, if one exists. It first checks for xmt, then for SCSI in reverse target ID order. | |
| qictape | Creates special files for 1/4-inch cartridge tape drives connected to an ISI QIC-O2 tape controller. | |
| magtape | Creates special files for 1/2-inch tape drives connected to a Xylogics Model 772 tape controller. See xmt(7M) for details. | |
| links | Creates both disk and tape special files. | |
| tps | Creates special files for SCSI tape drives. See tps(7M) for details. | |
| tapelinks | Makes only links to tape, nrtape, tapens, and nrtapens. Examine the target tapelinks in the script /dev/MAKEDEV for more information. |
Table 4-1 and Table 4-2 list the maximum tape capacities in megabytes (MB) for the tape formats IRIX supports. Note that these are maximum, not average, capacities.
Table 4-1. Cartridge Tape and DAT Capacities
Format | Capacity (max.) |
|---|---|
QIC24 | 60 MB (only reads/writes QIC24) |
QIC150 | 150 MB with 600XTD and 6150 tapes (reads QIC24, writes QIC120, and QIC150), 120 MB with 600A tapes (writes in QIC120 format), and 250 MB with 6250 tapes |
DAT | 1300 MB with 60-meter (1 hr) cartridge, 2000 MB with 90 meter (1.5 hr) cartridge; uses the DDS (not DataDAT) format |
8mm | 2093 MB with 112 meter (120 min) P6 (US) cartridge; |
 | Note: Almost all DAT drives use DDS format. 8mm tapes are also available in P6 lengths of 15, 30, 60, and 90 minutes for the U.S., and lengths of 15, 30, and 60 minutes for Europe; the P6 cartridge is for NTSC, and the P5 is for PAL. The drive must be jumpered to match the cartridge type. |
Table 4-2 shows maximum capacities for 9-track tapes. Note that 9-track tape capacities vary more than other types because of block size and tape length issues.
Table 4-2. 9-Track Tape Capacities
BPI | BLKSZ | 200 ft Length | 600 ft Length | 2400 ft Length | 3600 ft Length |
|---|---|---|---|---|---|
800 | 512 | 1 | 3 | 10 | 15 |
|
| 8192 | 1.8 | 5.5 | 21 |
|
| 64K | 2 | 6 | 23 |
|
|
|
|
|
|
1600 | 512 | 1.3 | 4 | 15 | 22 |
|
| 8192 | 3.5 | 11 | 41 |
|
| 64K | 4 | 12 | 45 |
|
|
|
|
|
|
6250 | 512 | 3.2 | 10 | 37 | 56 |
|
| 8192 | 12 | 37 | 145 |
|
| 64K | 15 | 44 | 175 |
| Note: 3600-foot tapes use thin tape (1.3 mm). BLKSZ indicates block size in bytes. |
For more information on making tape drive links, see the ln(1) and mknod(1M) reference pages.
If you suspect that the tape device has not been properly created or that the links between the low-level device name (for example, /dev/mt/tps0d3) and the symbolic name (for example, /dev/tape) are not correct, then you may want to log in as root and run the MAKEDEV script with the following command sequence:
cd /dev rm *tape* ./MAKEDEV [links or device-type] |
Device types can be:
tape links (to re-create all default tape links)
tape (for all tape devices)
qictape (for the older QIC-02 tape)
tps (for Kennedy SCSI 1/2" tape)
magtape (for Xylogics 1/2" tape)
Normally, the ./MAKEDEV tapelinks command is all you need to create links for the following default device names: nrtape, nrtapens, tape, tapens.
The following sections offer information on the two most popular 1/2-inch tape drives used with Silicon Graphics systems.
There are two DIP switch banks located on the rearmost board in the small cardcage at the rear of the Kennedy drive (see Figure 4-1 and Figure 4-2).
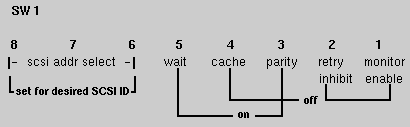
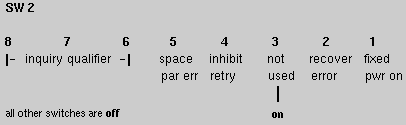
| Note: This applies only to two of the four SCSI controller boards. The other two, including the current versions, are configured from the front panel. |
This section provides useful information for administrators of 8 and 4 millimeter tape drives. The drives described in this section are the Exabyte 8mm and Sony Metal MP 120 (PG-120MP). They are available from Exabyte (303) 442-4333 and from Silicon Graphics.
Table 4-3 lists the various cartridge sizes and tape lengths available for the Exabyte 8mm tape drive.
Table 4-3. Exabyte 8mm Cartridge Tape Specifications
Cartridge Size | Tape Length | Formatted Capacity |
|---|---|---|
256 | 15 m | 291 MB |
512 | 28 m | 583 MB |
1024 | 54 m | 1166 MB |
1536 | 80 m | 1750 MB |
2048 | 106 m | 2332 MB |
This section provides information useful to administrators of systems with 1/4-inch cartridge (QIC) tape drives.
The following terms are defined for QIC tapes:
| QIC | Quarter-inch cartridge. | |
| QIC-02 | Host interface standard. | |
| QIC-11 | Recording format. Used on Sun Workstations with 60 MB drives. Cannot be read on Silicon Graphics systems. | |
| QIC-24 | Recording format: 9 tracks with a typical track width of .0135 inch. Density is 8000 bpi. Typical capacity is 60 MB with 6.6 MB per track. | |
| QIC-120 | Recording format: 15 tracks with a typical track width of .0065 inch. Density is 10,000 bpi (NRZI Recording Mode). Typical capacity is 120 MB, with approximately 8+ MB per track. | |
| QIC-150 | Recording format used on current Silicon Graphics drives. Uses 18 tracks. |
| Note: It is important to use actual QIC designations here, since many low-density drives can write (and read) in both QIC 24 and QIC11. Typically, none of the QIC150 drives can read QIC11. |
QIC150 drives can write in both QIC150 (using DC6150 or DC600XTD; the name changed to the first), and in QIC120, if the tape is a 600A-style tape. Typically, QIC150 drives cannot write to QIC24.
Also note that the word format is misleading; there is no formatting on QIC tapes (some variants do require formatting, but Silicon Graphics does not support them). Format actually refers to the pattern of data blocks. Tapes have a cartridge type, and they are written in the format correct for that type. The type is determined by the hole pattern in the tape (preceding Beginning Of Tape, or BOT). Further, tapes written on QIC150 drives have a reference burst (magnetic pattern) written at the beginning of the drive.
The noise you often hear when you first try to read (on a QIC150 drive) a tape written on a QIC24 drive is the drive trying to figure out how the tape was written, by switching modes and retrying all the possibilities, if it doesn't see both a QIC150 cartridge and the reference burst. Physically, the noise you hear is the serve motor stepping the read/write head over each track.
The difference between a QIC150 and QIC120 (600A) cartridge is in the mechanical tolerances. The QIC150 has tighter tolerances. About the only visible difference is in the pinch roller (next to the rubber drive roller). The QIC150 has a guide slot milled into it, and the 600A does not.
Table 4-4. Low-Density QIC Tape Drive Compatibility
Tapes | Read | Write |
|---|---|---|
LD tapes formatted in LDF | Yes | Yes |
LD tapes formatted in HDF | Process not recommended. | Process not recommended. |
HD tapes formatted in LDF | Yes | Yes |
HD tapes formatted in LDF assuming LDF is QIC 24 | Yes | Yes |
HD tapes formatted in HDF | No | Yes (rewrite to LDF) |
Table 4-5. High-Density QIC Tape Drive Compatibility
Tapes | Read | Write |
|---|---|---|
HD tapes formatted in LDF | Yes | No |
LD tapes formatted in HDF | Process not recommended. | Process not recommended. |
HD Tapes formatted in LDF | Yes | Yes |
HD tapes formatted in LDF assuming LDF is QIC 24 | Yes | No |
HD tapes formatted in HDF | Yes | Yes |
Regarding read/write activity for a low-density tape formatted in high density, it is not only not recommended, it isn't even possible if the tape is a QIC24 (DC300XL or DC450XL) tape. If the tape is a QIC120 (DC600A) read/write does work correctly, and there is no reason to recommend against it.
The dump command is used to back up all files in a filesystem, or files changed after a certain date, to magnetic tape or files.
If you are using the dump command to perform an incremental filesystem dump with a DAT tape drive, use the following recommendation to specify the capacity in kilobytes or megabytes of the DAT tape.
Reduce the 4mm tape-length parameter by 40% for the 60-meter tape, and leave as is for the 90-meter tape (2.0 gigabytes). You may want to trim an additional 5% or 10%, if you want to be conservative.
The following sections describe the recommended process for cleaning your tape drive.
To ensure data integrity, it is important to clean your tape drive on a regular basis. The process of removing the accumulation of oxide and/or dirt from the erase/write/read head surface and transport system is important for trouble-free operation of your equipment.
The tools you need are lint-free, nonabrasive cloths or cotton swabs, 90% or higher isopropyl alcohol or Freon-TF, and mild soapy water.
 | Caution: Never clean any plastic or rubber component (for example, the tape guide) in the tape path with 90% or higher isopropyl alcohol. Doing so degrades the composition of the component. If Freon-TF has been banned from use in your company, you can use the 90% isopropyl alcohol. However, you must wipe the alcohol residue off with a swab and water. |
A cleaning kit for the Cipher 880/890 can be purchased from Silicon Graphics. Contact your local sales representative for more information.
The components of the Cipher Tape Drive can be cleaned by placing the drive in the service access position. This is done by extending the unit fully on the mounting slides and opening the top plate casting. To assure safety in the open position, insert the cover stay pin (on the side of the top cover) in the hole in the chassis.
| Caution: If the tape drive is located in a rack, be sure to extend the anti-tip legs at the base of the rack. |
The drive should be cleaned after every four hours of tape movement.
Follow the cleaning method for each part listed:
| Tachometer roller |
| |||
Use a swab moistened with Freon-TF. Gently wipe the entire roller surface. The roller can be rotated by manually turning the take-up hub slowly. | ||||
| Take-up hub | Use a swab moistened with Freon-TF. Rotate the hub manually while gently wiping the tape-wrapping surface. | |||
| Roller guides | Use a swab moistened with Freon-TF. Rotate each roller and gently wipe the tape contact surface and flanges or washers. | |||
| Reel hub pads | Use a swab moistened with Freon-TF. Wipe the contact surface of each pad and remove any debris around the pad. | |||
| Head | Use a swab moistened with Freon-TF. Wipe the entire face of the head, paying particular attention to the recessed areas.
| |||
| Tape cleaner | Use a swab moistened with Freon-TF. Wipe each blade along its length. Remove accumulated oxides from the recessed area between the blades. | |||
| Front panel/door |
| |||
| Top plate casting |
| |||
| Filter | Locate and remove the filter from inside the air duct opening at the lower left of the front panel. Clean the filter with low-pressure compressed air (or vacuum) in the opposite direction of airflow, and reinstall. |
The drive should be cleaned after every four hours of operation.
Components of the Kennedy Tape Drive can be cleaned by placing the drive in the service position. This is done by extending the unit fully on the mounting slides and opening the dust cover. To open the dust cover, turn the two holding screws one quarter turn counterclockwise. To secure the dust cover in the open position, position the hole in the autolocking support bar onto the pin located on the side of the chassis. To expose the tape path components, lift the tape path dust cover next to the vacuum hub assembly.
| Note: If the tape drive is located in a rack, be sure to extend the anti-tip legs at the base of the rack. |
Follow the cleaning method for each part listed:
| Erase/write/read head |
| |||
| Tape path cleaning |
| |||
| Reel locking fingers |
|
This section provides you with a recommended process for cleaning your tape drive, including when the drive should be cleaned.
Tape Drives:
8mm Exabyte Tape Drive
4mm Archive DAT Tape Drive
The unit should be cleaned when enough data has been written to fill four tapes.
A cleaning kit for these tape drives can be purchased from Silicon Graphics. Contact your local sales representative for more information.
Perform the following steps:
Prepare the tape drive to be cleaned by powering on the unit. When the power-on cycle is complete, open the door and remove any data cartridges in the unit. Leave the door open.
Place the cleaning cartridge (from the cleaning kit) into the drive and close the door.
The remainder of the cleaning process is automatically performed by the tape drive. When the cleaning process is complete, the cleaning cartridge is automatically ejected from the drive. The average cleaning cycle is 15 seconds.
On the cleaning cartridge label, record the date the cleaning was performed, then store the cleaning cartridge for future use.
Do not store the cleaning cartridge if the cleaning dates have filled the cartridge label. Discard the cleaning cartridge and store a new cleaning cartridge for future use.
If the cleaning cartridge is ejected from the tape drive without performing a cleaning cycle (before 15 seconds), the cleaning cartridge has reached the end of its useful life and should be discarded.
Do not rewind and reuse the cleaning cartridge.